Abby’s Guide > Outdoor Power Equipment (Lawn Mowers, Snow Blowers, Chain Saws and more) > Discussions > Ariens Modified & Repowered 1032 (pics)
Outdoor Power Equipment (Lawn Mowers, Snow Blowers, Chain Saws and more) Discussions |
|
jrtrebor
 
Location: Michigan - 3 hours north of Chicago on the lake
Joined: Feb 9, 2010
Points: 539
![]()
|
 |
Ariens Modified & Repowered 1032 (pics)
Original Message Nov 10, 2011 5:35 pm |
|
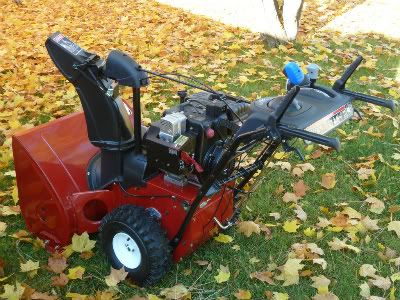
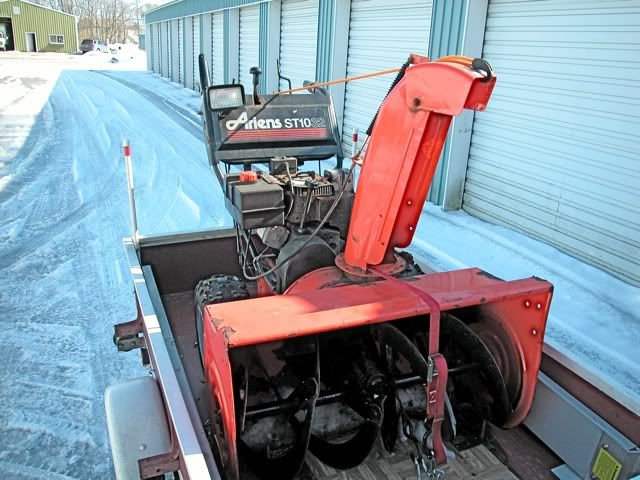
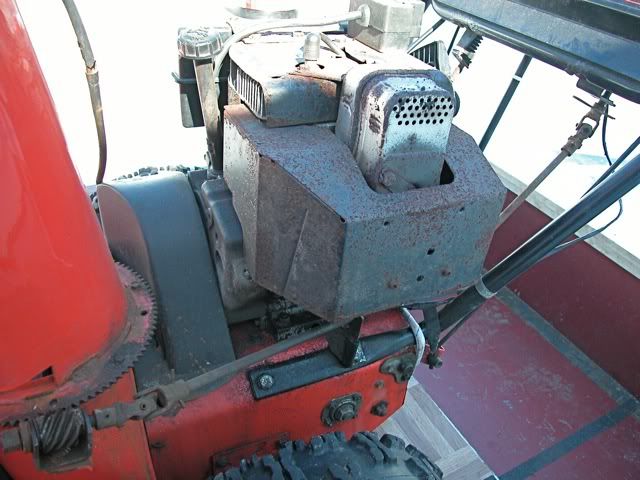
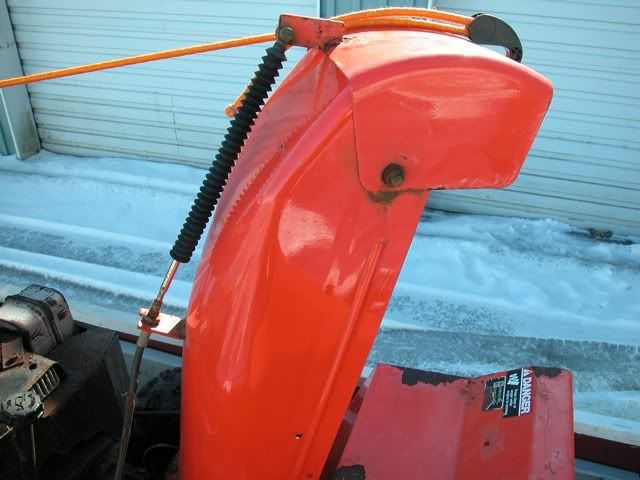
Finally got the electrical straightened out, I hope (with help from some on this board) and finished up everything else. Removed the 11hp Honda clone engine that I put on last year and replaced it with a 13hp Honda GX390 with a 10A lighting coil. Rewired everything. Added a stainless shield on the front of the blower Still have to get a new battery. And hose it down with Fluid Film. But other than that it's ready to go. Had some snow and sleet today. 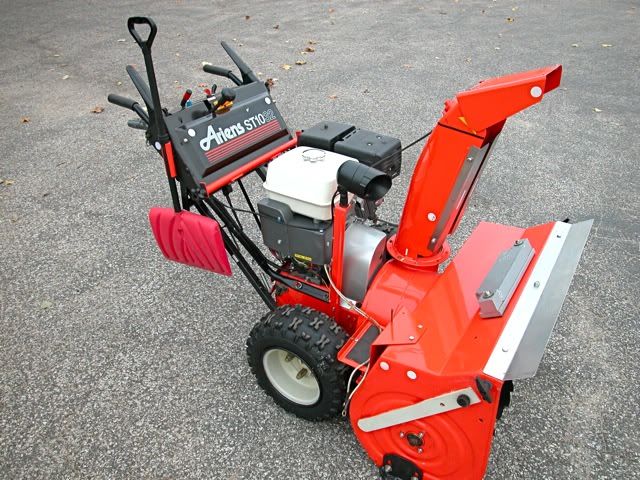 Serrated the Augers. Replaced the auger shaft bushing setup with flange bearings Replaced the impeller bearing. Gave everything a fresh coat of paint. 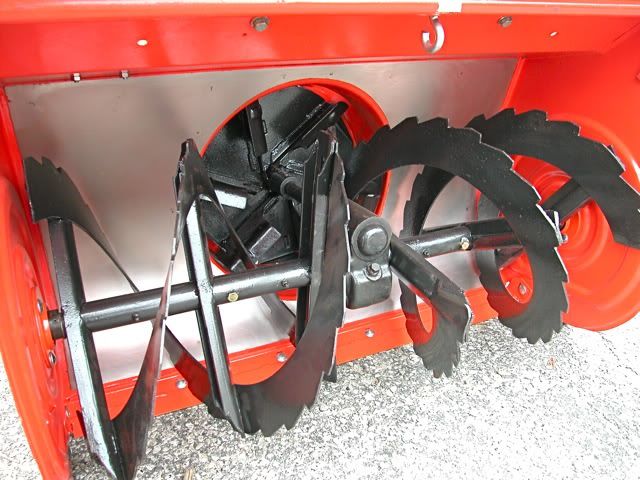 Tapered the deflector 3/8" on both sides to tighten up the stream a little 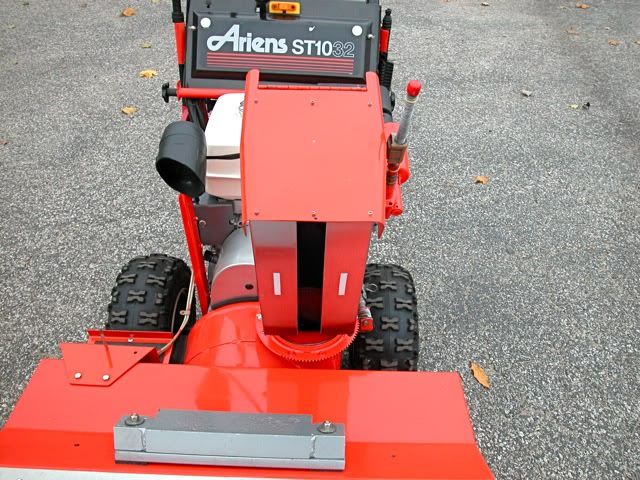 Fabricated a new belt cover. 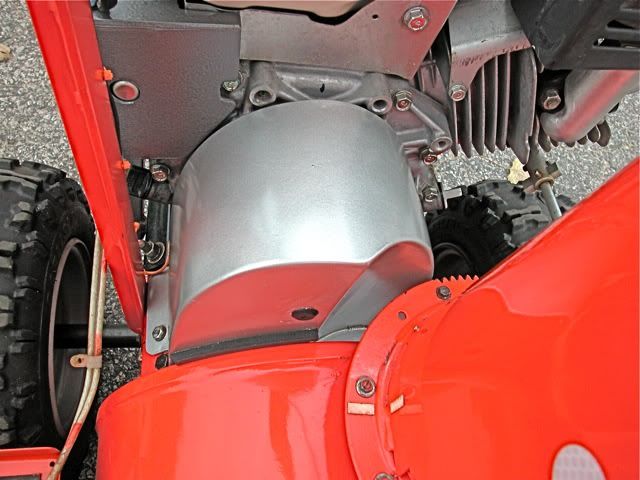 Modified the starter cover to cover the Rectifier and wiring. 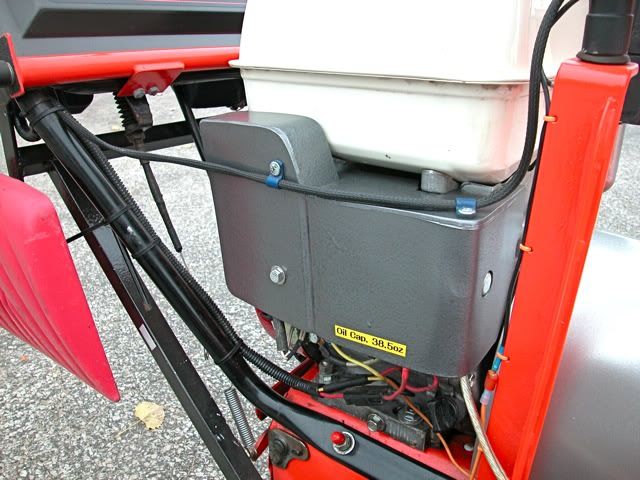 Removed the old steel shields on the front of the chute and replaced them with stainless ones. When I had the wheels off I realized that I could thread in some 1/2 bolts from the back side of the wheel plate to make studs. Then use car lug nuts to hold the wheels on. Now all the threads are protected from the weather inside the lug nuts. I'm keeping my eyes open for a pair of cheap 8" moon hub caps. 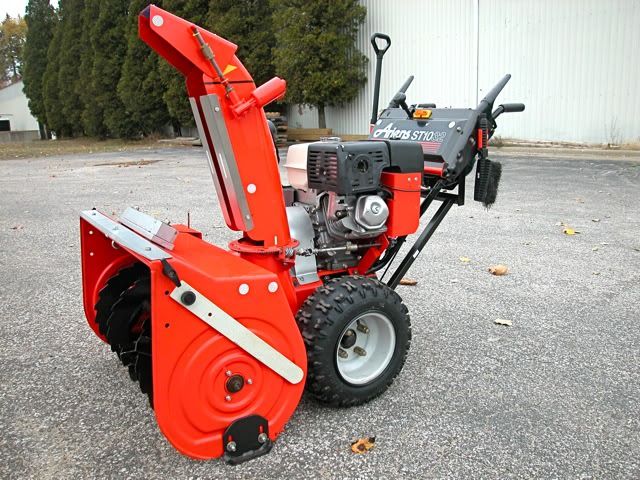
This message was modified Nov 10, 2011 by jrtrebor
|
jrtrebor
Location: Michigan - 3 hours north of Chicago on the lake
Joined: Feb 9, 2010
Points: 539
![]()
|
 |
Re: Ariens Modified & Repowered 1032 (pics)
Reply #5 Nov 11, 2011 2:53 am |
|
Will this blower perform better then a Honda ? It blew snow pretty well with the 11hp. So we will have to wait and see how it does with the 13hp. I don't know if it will out throw a Honda. But the Honda's have the Hydro Drive which is hard to beat. I did add a lower 1st gear which should help in really deep and or wet snow. Here is a video I shot last winter. Hope to shoot another one sometime this winter.
This message was modified Nov 11, 2011 by jrtrebor
|
jrtrebor
Location: Michigan - 3 hours north of Chicago on the lake
Joined: Feb 9, 2010
Points: 539
![]()
|
|
|
Re: Ariens Modified & Repowered 1032 (pics)
Reply #6 Nov 11, 2011 3:06 am |
|
Wow that is a really good looking rebuild! It looks fantastic. Did you put an impeller kit on this? Thanks for your comment. As shryp posted. I decreased the clearance between the impeller blade tips and the housing by extending the blade length with weld. The clearance is about 1/16" + in most place around the housing. It made a noticeable difference in how the blower handles wet sloppy snow.
This message was modified Nov 11, 2011 by jrtrebor
|
jrtrebor
Location: Michigan - 3 hours north of Chicago on the lake
Joined: Feb 9, 2010
Points: 539
![]()
|
|
|
Re: Ariens Modified & Repowered 1032 (pics)
Reply #9 Nov 11, 2011 4:57 am |
|
This is a serious machine. Do you use this professionally or just personally? I like the fabrication around the engine, like the custom belt cover. Looks factory made.
How did you acquire the Honda engine? I use it for a little a little of both. The covers are made out a product called Sintra. It's 1/8 PVC sheet material. It's great stuff. Cuts with utility knife or a powered saw, sands easily. Will bend to what ever shape you want it to when heated. With a hair dryer, heat gun or hot water. Glues together with any Cyanoacrylate adhesive which is the fancy name for super glue/crazy glue. The joints are a really strong solvent cement type joint. Water proof and excepts paint well. I bought the engine at an online auction. Just one of those deals. I got lucky, nobody was really bidding on it. Got it for $128.00 which I thought was a steal.
This message was modified Nov 11, 2011 by jrtrebor
|
Shryp
Location: Cleveland, OH
Joined: Jul 25, 2010
Points: 532
![]()
|
|
|
Re: Ariens Modified & Repowered 1032 (pics)
Reply #13 Nov 11, 2011 7:31 am |
|
Looks Great, glad to hear you are all squared away with the electrical, where did you get the light? I like the fab work on the covers. What size Augers are they and did you make a template? I am dying to try out my mid 80's cub cadet 8/26 which i bought this spring with no motor. I put an 11hp honda clone and a 1/2" larger auger/impeller pulley on the engine and suspect that at only 26" width bucket the 11 is probably just a little overkill  Here is his light: http://www.abbysguide.com/ope/discussions/54409-0-1.htmlHere is is auger template: http://www.abbysguide.com/ope/discussions/59738-0-1.htmlYou even commented on it! :) Side note: Is it sad that I visit this place enough to remember these things?
This message was modified Nov 11, 2011 by Shryp
|
jrtrebor
Location: Michigan - 3 hours north of Chicago on the lake
Joined: Feb 9, 2010
Points: 539
![]()
|
|
|
Re: Ariens Modified & Repowered 1032 (pics)
Reply #14 Nov 11, 2011 10:58 am |
|
Looks Great, glad to hear you are all squared away with the electrical, where did you get the light? I like the fab work on the covers. What size Augers are they and did you make a template? I am dying to try out my mid 80's cub cadet 8/26 which i bought this spring with no motor. I put an 11hp honda clone and a 1/2" larger auger/impeller pulley on the engine and suspect that at only 26" width bucket the 11 is probably just a little overkill Good memory - shryp. I checked the bulb the other day and it's a 35W not a 30W like I had posted. Well I hope it's squared away! Only took me a month, at least I didn't melt anything. The augers measure 15 1/2" but I would bet they were 16" when new. The impeller is 14" with five blades. I increased my blower drive pulley a 1/2" in diameter as well (3 1/4") A 26" bucket with that 11hp should really move some snow with the increased impeller and auger speed. The 11hp should be good it will let you travel at a little faster ground speed. In the beginning I noticed that the bigger engine with the larger pulley does put more strain on the belt. The impeller and augers don't mind the extra RPM and the motors got the power. So the belt is the part that's really having to deal with all the extra torque when you get into a long stretch of really deep snow. Haven't blown a belt yet. But did stretch one out in one really big storm. I was just moving to fast for the snow density and depth. There was a learning curve after the repower. So since then I've kind of watched that or kept myself aware of it. User error is what causes most blower break downs. So if it does blow one I'll have no one to blame but myself. I hoping the new additional and lower first gear will help with that. One thing that I was really surprised by was how much easier and freer the impeller and augers spun. After putting in a new impeller bearing and replacing auger shaft bushing set up with flange bearings. The whole assembly would free spool a least 1 1/2 revolutions. When you'd give the large belt pulley on the impeller shaft a good spin. It wouldn't do that before.
This message was modified Nov 11, 2011 by jrtrebor
|
jrtrebor
Location: Michigan - 3 hours north of Chicago on the lake
Joined: Feb 9, 2010
Points: 539
![]()
|
|
|
Re: Ariens Modified & Repowered 1032 (pics)
Reply #16 Nov 11, 2011 11:35 am |
|
Nice work, all the little nice touches for personalization. I like the little reflective discs for conspicuosity, the sheet metal work for the custom covers, and the chute straight ahead alignment marks.. Very stout looking unit with a GX390 engine to match. Looks like you got quite a deal on that genuine GX engine for the price of a clone.
Did you add handle brace to the tractor section? What's the hook in the bucket for?
Thanks aa335 - I also use the alignment marks to tell me when I'm about out of teeth on the chute gear when turning the chute left or right. I did make a handle brace good catch. I just didn't like the feeling of the handles flexing a little when you lifted the blower off the ground. It's still and old blower (26 years) and even thought the handles down where they bend to bolt onto the tractor. Are tubes with tubes inside. I have seen them crack at the back bolt. Not a good thing to have happen in the middle of a storm. So handle braces became the project for the day. It's got a much better feel to it now. And the extra weight of the battery on one side with the weights on the top of the blower don't concern me. The hook is a place to hook a small chain binder to when I secure it in my trailer. This is the way it was last year. It worked I didn't like it that much. And with the new shield on the front it wasn't going to work at all. 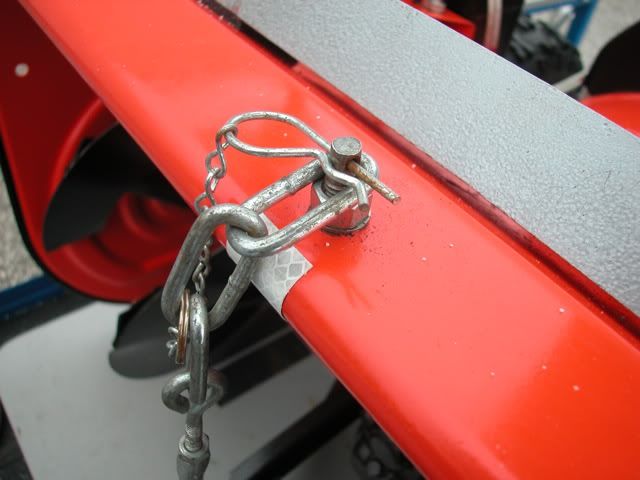 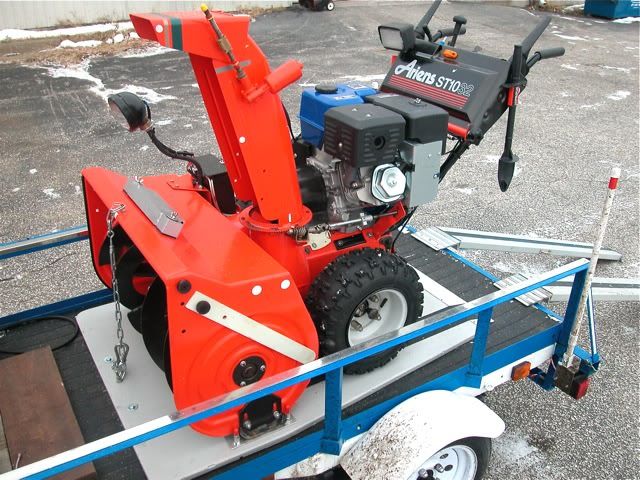 The plates and posts capture the skids so the blower can't roll forward or backward or move left or right.. The chain it front keeps the blower down so it can't lift off the capture plate. And the chain in back keeps the back end down so it can't hop around. I also use a velcro strap to keep the drive handle down which acts like a parking brake. Once it's on the trailer it takes about 50 seconds to completely secure it. Even with gloves on. This year the chain binder will hook it the eye bolt and hold the front end down. The gray board the blower is sitting on is 3/4" plywood. It's bolted down to the trailer bed with four 5/16" bolts. They run through the bed and screw into Tee Nuts put in from the bottom side of the bed. That way I can easily take the whole thing out after the season. 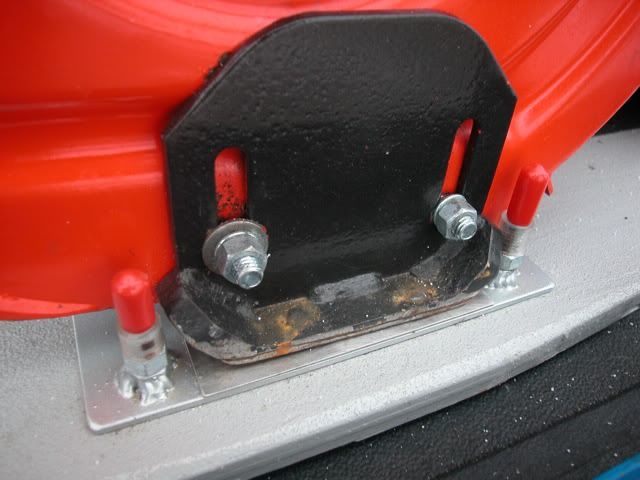 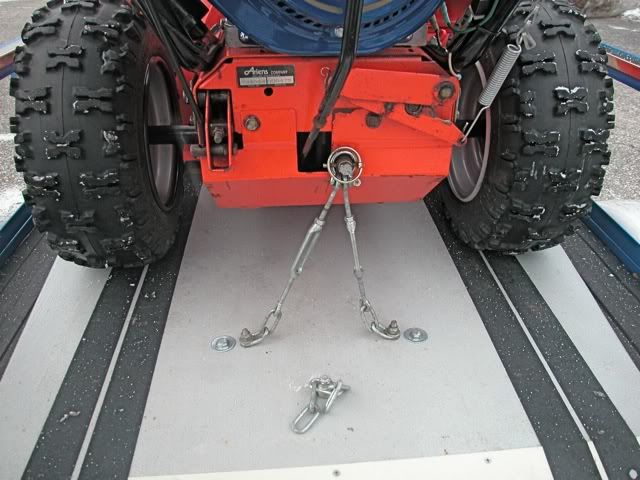 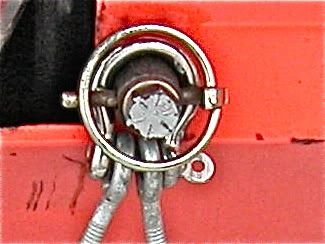
This message was modified Nov 11, 2011 by jrtrebor
|
sscotsman
Joined: Dec 2, 2009
Points: 56
![]()
|
|
|
Re: Ariens Modified & Repowered 1032 (pics)
Reply #21 Nov 14, 2011 2:41 pm |
|
Wow! that is sweeeeet! very cool..  [quote]Thanks very much, glad you like it. It's Model # 924084. Not really sure what year it is but I believe late Eighties. [/quote] I have model 924084 listed as produced from 1992 to 1996. possibly plus or minus a year. http://1stclass.mylargescale.com/scottychaos/Ariens/Page7.html Do you still have the Tecumseh engine you took of it? if so, the serial number on the engine tag might be able to ID the year of the engine, which would most likely ID the year of the snowblower.. Scot
This message was modified Nov 14, 2011 by sscotsman
|
manjestic
Location: North Shore, MA
Joined: Oct 30, 2011
Points: 87
![]()
|
|
|
Re: Ariens Modified & Repowered 1032 (pics)
Reply #25 Nov 14, 2011 5:36 pm |
|
I would also be interested in any painting info you'd care to share. The fact that the After pics are beautiful, and Before pics show a fair bit of rust, is encouraging. At least that can be addressed if you're willing to take the time, which you obviously did. Ditto. Especially for folks like me who don't have access to sand blasting, paint booth, compressed air... Sounds hopeless when I type that. Wonder what a sandblasting service costs?
This message was modified Nov 14, 2011 by manjestic
|
jrtrebor
Location: Michigan - 3 hours north of Chicago on the lake
Joined: Feb 9, 2010
Points: 539
![]()
|
|
|
Re: Ariens Modified & Repowered 1032 (pics)
Reply #27 Nov 14, 2011 7:13 pm |
|
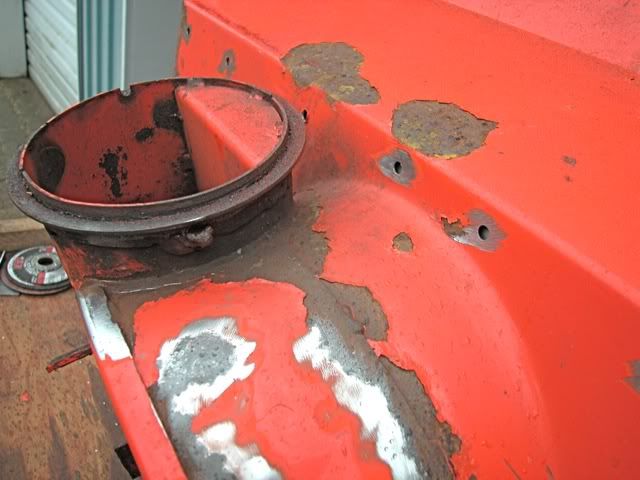
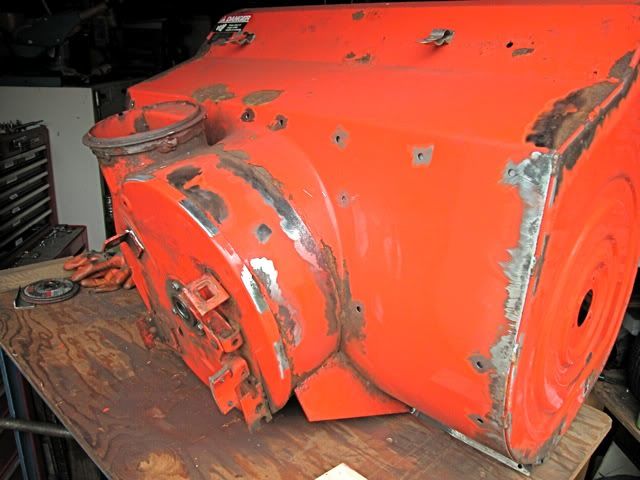
Thanks so much for all you nice comments Be more that happy to share my painting experiences. I didn't sandblast the housing even though I have a small blaster. Just didn't have a compressor at the time to power it. Blasting is the way to go. If you can find someone who isn't to expensive. And knows what they are doing. You can warp sheet metal if you don't do it right. I just used a right angle grinder. Different grit sandpapers and 3m Scotchbrite Surface Conditioning disks. But just sand paper and some good old fashioned elbow grease will do. I also ground/sanded the off edges off the steel at all the overlapping seam joints. To round the corners. I used automotive Seam sealer or Spot putty to fill in the seams of those joint. So as to create a more rounded corner or edge. Paint will stay on much longer, on a round edge than a squared corner edge. If you look at the finished photos. You won't see any gaps or spaces in the paint at the seams on the ends of the blower housing. You can hardly even see the seams. I think I probably coated any spots that still looked a little rusty after sanding with a Rust Stopper paint/primer. Usually you would coat any bare steel with an Self Etch Primer before applying a primer but I think I skipped that. (You wouldn't want to do that if you were painting a car). Everything was then well coated with a Rust-Oleum Red Oxide Primer with Rust Inhibitor. Great stuff. It goes on think and fills in small imperfection like rust pits. Dries fairly quick and can be sanded smooth (if you choose) to give you a nice smooth surface before the top coat. I believe this is an important step. That primer really binds to the steel and also gives the top coat something good to bind to as well. The primer will be dry in 20 to 30 minutes or so depending on air temp. and humdity. But I usually call it a day by then and let it dry overnight. Before I top coat it, I usually run a green Scotchbrite pad over all the primer to knock of any overspray or little nubs that may be sticking up. Or I might sand any really rough spots or orange peel smooth. Make sure that your hands are clean and any rags you might use are clean as well. And if you doing this in the summer, even sweat on your hands can put a slight oil film on the primer that the paint won't want to stick too. Wipe the whole thing down after sanding with a clean rag to remove any dust. Or use a clean dry paint brush which also help to get dust out of corners and cracks. For the top coat I use Rust-Oleums Engine Paint. "Chevy Orange" not the "Red Orange Chevy orange" they are two different colors. I've tried quite a few and this paint over a Red Oxide primer is almost dead on to the Ariens orange. Any chain auto part store carries it. I usually start by giving the entire part a tack coat. Which is nothing more than a light see through coat. If the part is small let it sit for a couple of minutes, not long. If the part is large like a blower housing. You can finish with the tack coat and go back to where you started and start putting it on thicker to really cover. But go back and forth over a certain spot until it's covered well. Don't just spray it on in one continuous spray. You might get some runs. Spray to the left come back over the same spot going to the right and back again to the left. It should be completely covered and shiny by the third trip. Over lapping each motion and moving downward. Watch so that the overspray isn't landing on area that you just painted. I usually work from the top down. When you think your finished and your happy with what your seeing. Stop and look over things real close. Look for spots where the paint may be a little thin or spots that you missed. I should clarify something here, I said I usually work from the top down. I do. But I usually, as with the blower will put a coat on the bottom of things first. Places that are going to be hard to get to with a good coat with out having the blower turned over. So I do the bottom of things fairly well first. Then started from the top down. You don't see the bottom of things anyway. So just getting a good thick coat on the surface is all your trying to do. If the next day you see a spot you really missed. Wait a few days before you give it a heavy coat. If you try putting on a heavy coat over paint that is still not completely dry. You can soften up the bottom coat and the paint will wrinkle. That was the long answer. It sounds like a lot to go through but it's really not. You could come close to doing the whole blower in one day. It's just kind of dirty work. Short answer Rust-Oleum Rust stopper primer Rust-Oleum Red Oxide Primer with Rust inhibitors Rust-Oleum Chevy Orange Engine Paint. (Not Chevy Red Orange) In the begining
The holes you see were drill so I could plug weld the stainless steel liner in place from the back side.
|
jrtrebor
Location: Michigan - 3 hours north of Chicago on the lake
Joined: Feb 9, 2010
Points: 539
![]()
|
|
|
Re: Ariens Modified & Repowered 1032 (pics)
Reply #28 Nov 14, 2011 7:15 pm |
|
Wow! that is sweeeeet! very cool.. [quote]Thanks very much, glad you like it. It's Model # 924084. Not really sure what year it is but I believe late Eighties. [/quote] I have model 924084 listed as produced from 1992 to 1996. possibly plus or minus a year. http://1stclass.mylargescale.com/scottychaos/Ariens/Page7.html Do you still have the Tecumseh engine you took of it? if so, the serial number on the engine tag might be able to ID the year of the engine, which would most likely ID the year of the snowblower.. Scot
No, the engines gone. But I do still have the engine tag numbers.
|
bcjm
Location: Washing DC Area
Joined: Dec 1, 2011
Points: 25
![]()
|
|
|
Re: Ariens Modified & Repowered 1032 (pics)
Reply #29 Dec 6, 2011 12:05 pm |
|
I found this not so old thread. Very nice job. This is exactly what I want to do to fit my Honda GX390 engine. My snow blower is Arines 924029. I think we have the same deck size. Did you drill the new holes on the existing deck to mount the Honda Engine? Can you secure the bolts from under the deck? My estimate was that it does not have enough space but apparently you did it. |
FrankMA
Location: Merrimack Valley/Northeastern Mass
Joined: Jun 30, 2010
Points: 587
![]()
|
|
|
Re: Ariens Modified & Repowered 1032 (pics)
Reply #30 Dec 6, 2011 12:21 pm |
|
jrtrebor: You do some really nice work!
Toro Wheel Horse 522xi GT, Honda HS928TA, Honda HS621AS, Honda HS520A, Toro CCR3000 (work in progress), Honda HS624WA (sold 08/23/2010), Stihl BR550 Backpack Blower, Stihl MS250, McCulloch MS1635, Honda EM6500SX Generator
|
jrtrebor
Location: Michigan - 3 hours north of Chicago on the lake
Joined: Feb 9, 2010
Points: 539
![]()
|
|
|
Re: Ariens Modified & Repowered 1032 (pics)
Reply #33 Dec 6, 2011 4:48 pm |
|
I found this not so old thread. Very nice job. This is exactly what I want to do to fit my Honda GX390 engine. My snow blower is Arines 924029. I think we have the same deck size. Did you drill the new holes on the existing deck to mount the Honda Engine? Can you secure the bolts from under the deck? My estimate was that it does not have enough space but apparently you did it. Thanks very much. The decks are the same. Yes, the holes were drilled on the existing deck. And yes you can insert and secure the bolts from under the deck. One side of the new holes are just inside, or right on the bend line of the deck. A socket will fit on the heads from underneath. The new holes are 3/8" but it's important to drill an 1/8" pilot hole then go to a 1/4" and then 3/8". With the holes being so close to the bend I was concerned the bit wouldn't track straight if I used a 3/8' bit from the start. The 11 and 13hp Honda's have the same bolt pattern. Tecumseh 5 and 7hp are the same 8 and 10 are the same but different from the 5 & 7.
This message was modified Dec 6, 2011 by jrtrebor
|
bcjm
Location: Washing DC Area
Joined: Dec 1, 2011
Points: 25
![]()
|
|
|
Re: Ariens Modified & Repowered 1032 (pics)
Reply #34 Dec 7, 2011 4:29 am |
|
Since the Honda crankshaft is higher, I assume you had to buy new belts. Do you recall the length of the new belts. The original belt cover wouldn't fit anymore. How did you make the belt cover? Is that alumnium? The one you made has such a professional look. |
jrtrebor
Location: Michigan - 3 hours north of Chicago on the lake
Joined: Feb 9, 2010
Points: 539
![]()
|
|
|
Re: Ariens Modified & Repowered 1032 (pics)
Reply #35 Dec 7, 2011 5:22 am |
|
Since the Honda crankshaft is higher, I assume you had to buy new belts. Do you recall the length of the new belts. The original belt cover wouldn't fit anymore. How did you make the belt cover? Is that alumnium? The one you made has such a professional look. You do need longer belts. I don't recall what length but I will take a look at the spares I have. The original belt cover isn't tall enough. The first one I made I simply modified the original cover. The material I used to make the second cover is called Sintra. It's a PVC sheet material. I will take some photos and post them later today.
|
Shryp
Location: Cleveland, OH
Joined: Jul 25, 2010
Points: 532
![]()
|
|
|
Re: Ariens Modified & Repowered 1032 (pics)
Reply #36 Dec 7, 2011 5:51 am |
|
|
JoelKlein
I wonder how a 2021 snow blower will look like...
Joined: Sep 25, 2011
Points: 74
![]()
|
|
|
Re: Ariens Modified & Repowered 1032 (pics)
Reply #37 Dec 7, 2011 5:52 am |
|
Hi.
I love the idea of your project!
I think you should open an official business of modifying/recycling Snow Blowers, and eventually open a new company and start building your "own" models.
When are you mounting a Yamaha engine?! (Just kidding)
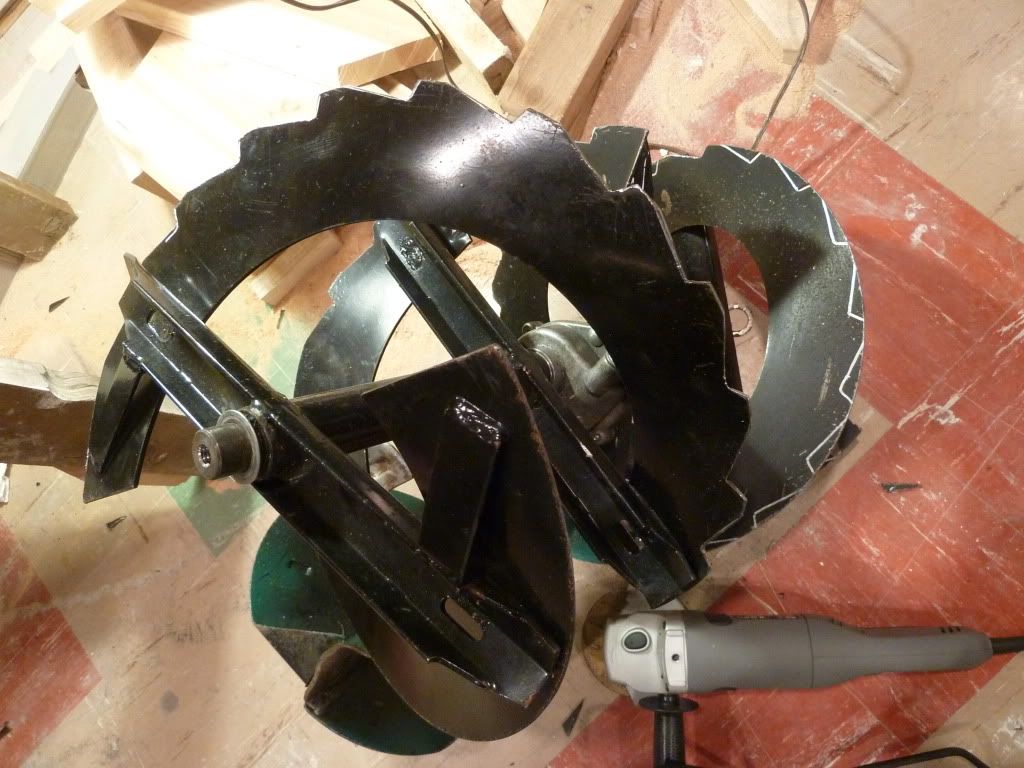
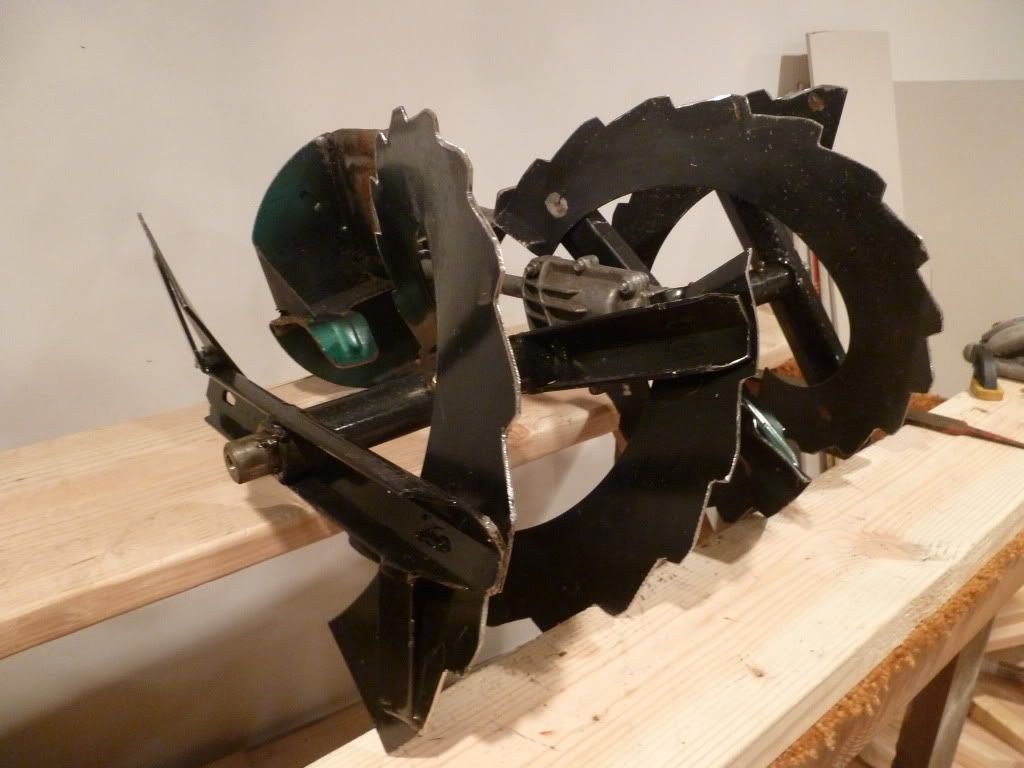
I only have one question: what does it take to Serrated the Augers? Thanks for your Knowledge
Toro 1028 OXE
|
bcjm
Location: Washing DC Area
Joined: Dec 1, 2011
Points: 25
![]()
|
|
|
Re: Ariens Modified & Repowered 1032 (pics)
Reply #38 Dec 12, 2011 4:02 am |
|
I have finished my conversion this weekend. Took me a lot of try and error to find the right length belts. For whoever wants to do the same conversion in the future, I have two things to note: 1. The driving belt length is critical. I bought one that fit but the idler pulley touched the metal rod that engages/disengages the auger. It happened when auger disengaged. I could not figure it out why originally. I thought something needed adjustment but it turned out that the driveling belt is too short caused the idler pulley not in the right position. 36” is what I used at the end. 2. The new mounting holes can be drilled a little more closer to the auger. The crankshaft pulley can be shifted on the crank shaft to line up with the auger and driving pulleys. I had the crank shaft pulley at the end of the crank shaft when I did the measurement so the engine sits a little too far back towards the handle bar. I don’t know if that will make it back heavy when blowing snow. Now I just need to make a belts cover. to complete.
|
jrtrebor
Location: Michigan - 3 hours north of Chicago on the lake
Joined: Feb 9, 2010
Points: 539
![]()
|
|
|
Re: Ariens Modified & Repowered 1032 (pics)
Reply #39 Dec 12, 2011 4:35 am |
|
Hi.
I think you should open an official business of modifying/recycling Snow Blowers, and eventually open a new company and start building your "own" models.
I only have one question: what does it take to Serrated the Augers? Thanks for your comments. I am thinking about producing belt covers. Actually I'm working on the finial version of one today. For making the serrated augers. I made a pattern out of thick card stock. Traced off of an auger on a blower at Home Depot. Took the augers off my blower. Traced the pattern onto my augers using a lacquer pencil. Then used a 4 1/2" right angle grinder with a .045 metal cutting disc to cut the teeth into the augers. I made a jig to hold the augers in the vertical position while doing the cutting. Screwed a pipe flange to a work bench. Threaded in a 30" long piece of pipe and then slide the auger onto the pipe. Made all of the short cuts first, then the long angle cuts. The holding jig allows you to spin the auger as your working on it. It also makes it easier to paint them when your finished. Paint one side, slide it off the pipe flip it over paint the other side.
|
coasteray
El Toro! 1028 LXE
Tecumseh 358cc
10hp
Location: NE Washington State
Joined: Mar 2, 2008
Points: 142
![]()
|
|
|
Re: Ariens Modified & Repowered 1032 (pics)
Reply #43 Dec 12, 2011 10:57 pm |
|
Your augers turned out nice.
It's a lot of cuts to make isn't it.
Can't wait to see how they bite in on EOD piles.
Wish I had the lighting you've got.
Thanks!. Yeah, it was a lot of work, mostly just the time, as you already know, but it sure does take a good eye and a steady hand to make sure the cutting blade goes where you want it to. Like you said in your original post in October, it took a couple of hours. The noise from the grinder is very annoying, but I had those 3M headset-style earmuffs from ACE hardware that kept my ears safe. The end result is the reward, though. It makes me appreciate your own project on that ST1032 a lot more. The lighting in my son's basement is 8 can lights. It really lights up the place. About 25 feet by 12 feet. It's currently in the final stages of its own remodeling. Extra mentions: You might notice the greenish-looking impeller. He got a new replacement. The old one had a bent tip (about a 30-degree bend), and the rest was dinged and dented around some of the blade edges. Too rough for a Clarence kit. He's going to sand and repaint the housing where it needs it, not a total strip and paint because the rest is pretty nice yet. We also adjusted the chain slack in the gearbox, greased it inside and on the auger shafts, put in a new pulley belt and two new lower handlebars (the old ones were stress-cracked at the bottoms where they attached to the body!), and installed a new friction disc due to bad rubber on the old one causing some slippage. All else looks very fine, but we're going to re-check the belt pulleys. It would have been fun to have put a new Briggs on it (maybe a 305cc instead of a 250cc, just to give it a little boost). My son has the headlight on it now, but it would be nice to also have a remote deflector kit installed on it, though the current manual approach isn't so bad.
This message was modified Feb 12, 2014 by coasteray
 El Toro! 1028 LXE - Tecumseh 358cc 10hp Let it snow! Let it snow! Let it snow! El Toro! 1028 LXE - Tecumseh 358cc 10hp Let it snow! Let it snow! Let it snow!
|
coasteray
El Toro! 1028 LXE
Tecumseh 358cc
10hp
Location: NE Washington State
Joined: Mar 2, 2008
Points: 142
![]()
|
|
|
Re: Ariens Modified & Repowered 1032 (pics)
Reply #46 Nov 21, 2012 9:36 pm |
|
I wonder if either of your gentlemen would be kind enough to provide us with the distance between the tip of each tooth and the depth of the valleys?
Thanks I just happened to see this old post near the top of the list of threads, then saw your post. I got out my cardboard template that I used at Home Depot to measure an Ariens Platinum 30 blower to give you the measurements you were asking about. The "valleys" are .5 inch. From "tip to tip" it is 2.5 inches. Also realize that the "tip" has that little flat spot, which is, interestingly enough, also .5 inch. They could have designed it to be at a right angle, but this looks better. I'm counting from where each valley comes back up to the top, ignoring that little flat spot. I hope what I just said is clear. You should do the same thing we did by taking a small piece of cardboard into Home Depot, find a Platinum 30 blower, and take your pencil or pen to trace it. Hold the cardboard very tightly behind or in front of the auger and then draw carefully without letting the cardboard slip at all, and you should have no problem. My piece of cardboard is 10.5 inches long and 4 inches high. I then cut it out with scissors so my son and I could trace the pattern onto his auger with a silver grease pen. To be honest, the Platinum 30 auger is slightly bigger than the auger on my son's Ariens ST824. However, when applying the template to his auger, we just sort of rotated the template a tiny bit when needed as we went along to accomodate the difference. It doesn't have to be an exacting rocket-science kind of thing, but believe me, it came out really well. Hope this helps. Let us know what happens if you're entertaining the idea of converting your auger. Here's the original thread that started me on this project: http://www.abbysguide.com/ope/discussions/59639-0-1.html
This message was modified Nov 25, 2012 by coasteray
El Toro! 1028 LXE - Tecumseh 358cc 10hp Let it snow! Let it snow! Let it snow!
|
erock1
Joined: Jan 3, 2014
Points: 1
![]()
|
|
|
Re: Ariens Modified & Repowered 1032 (pics)
Reply #47 Jan 4, 2014 11:27 am |
|
Happy New Year. I am a brand new member here. Your machine in particular caught my eye. Was thinking of doing some modification to my blower chute similar to your first metal shields that you experimented with. I was wondering what your impression was of that setup as opposed to your current stainless setup ?? What do you think of a one-piece covering, verses an open channel down the center, such as you have ?? Did either modification induce any new flexure or vibration points ?? What an incredibly neat job you did on that !!! Congrats !!!
-Eric
|
tbe55
Joined: Jan 17, 2015
Points: 2
![]()
|
|
|
Re: Ariens Modified & Repowered 1032 (pics)
Reply #50 Jan 18, 2015 6:07 am |
|
Thank you for sharing your fantastic work! I am thinking about getting one of this machine or a ST1236 to clear snow on our neighborhood pond for the kids to skate on. I would like to be able to throw the snow as far as possible so that I can get the work done in a single run. I've heard that the big machines throw snow better when more snow are fed into the auger house. What is your experience with your machine on shallow snow? Can it throw 1-2 inch snow far? You mentioned that you replaced the auger flank bushing with bearings. What is the part you used? Thanks
|
jrtrebor
Location: Michigan - 3 hours north of Chicago on the lake
Joined: Feb 9, 2010
Points: 539
![]()
|
|
|
Re: Ariens Modified & Repowered 1032 (pics)
Reply #51 Jan 18, 2015 8:22 am |
|
Thank you for sharing your fantastic work! I am thinking about getting one of this machine or a ST1236 to clear snow on our neighborhood pond for the kids to skate on. I would like to be able to throw the snow as far as possible so that I can get the work done in a single run. I've heard that the big machines throw snow better when more snow are fed into the auger house. What is your experience with your machine on shallow snow? Can it throw 1-2 inch snow far? You mentioned that you replaced the auger flank bushing with bearings. What is the part you used? Thanks Thanks you, and your welcome. Most blowers will throw their furthest when they have an adequate amount of snow being fed to the impeller But too much and they can get lugged down. With a 2 stage that has multiple forward speeds. You can offset the problem with having only a couple of inches by traveling faster with the blower. You also have to run the engine at full throttle to get the farthest throw. Here is a video of my blower throwing about five inches using fifth gear. Ariens 1332I used "Flange bearings" you can find them on ebay or other places. Mine look like this. Flange bearing
This message was modified Jan 18, 2015 by jrtrebor
|
tbe55
Joined: Jan 17, 2015
Points: 2
![]()
|
|
|
Re: Ariens Modified & Repowered 1032 (pics)
Reply #52 Jan 23, 2015 6:32 am |
|
I have chances to get a older ST1032 for $250 or a relatively newer old ST1236 for $400. For either one, I probably will swap the stock engine with a 13hp harbor freight engine and do other modification as you did. Do you have any recommendation for which one to take? Thanks. http://janesville.craigslist.org/grd/4843382987. html http://madison.craigslist.org/grd/4817058304.html
This message was modified Jan 23, 2015 by tbe55
|
NorthMaine
Joined: Feb 5, 2015
Points: 2
![]()
|
|
|
Re: Ariens Modified & Repowered 1032 (pics)
Reply #58 Feb 7, 2015 11:40 am |
|
Notice any benefit to the partially closed front of the chute vs open? Machine looks great!
|
|
|

 I did the exact same thing you did. I went to Home Depot and drew the auger pattern on some cardboard, then we did exactly what you did. I hope you don't mind me mentioning your post about it. The pictures tell the story well.