Abby's Guide to Outdoor Power Equipment (Lawn Mowers, Snow Blowers, Chain Saws and more)
Username Password
Discussions Reviews More Guides
Abby’s Guide > Outdoor Power Equipment (Lawn Mowers, Snow Blowers, Chain Saws and more) > Discussions > Ariens Modified & Repowered 1032 (pics)

Outdoor Power Equipment (Lawn Mowers, Snow Blowers, Chain Saws and more) Discussions

Search For:
jrtrebor


Location: Michigan - 3 hours north of Chicago on the lake
Joined: Feb 10, 2010
Points: 539

Ariens Modified & Repowered 1032 (pics)
Original Message   Nov 10, 2011 10:35 pm
Finally got the electrical straightened out, I hope (with help from some on this board)
and finished up everything else.

Removed the 11hp Honda clone engine that I put on last year and replaced it with a 13hp Honda GX390
with a 10A lighting coil.  Rewired everything.  Added a stainless shield on the front of the blower
Still have to get a new battery.  And hose it down with Fluid Film. But other than that it's ready to go.
Had some snow and sleet today.


Serrated the Augers.  Replaced the auger shaft bushing setup with flange bearings
Replaced the impeller bearing.  Gave everything a fresh coat of paint.


Tapered the deflector 3/8" on both sides to tighten up the stream a little


Fabricated a new belt cover.


Modified the starter cover to cover the Rectifier and wiring.


Removed the old steel shields on the front of the chute and replaced them with stainless ones.
When I had the wheels off I realized that I could thread in some 1/2 bolts from the back side of the
wheel plate to make studs.  Then use car lug nuts to hold the wheels on.  Now all the threads are protected from the
weather inside the lug nuts.  I'm keeping my eyes open for a pair of cheap 8" moon hub caps.


This message was modified Nov 10, 2011 by jrtrebor
Replies: 22 - 31 of 58Next page of topicsPreviousNextNext page of topicsAllView as Outline
bus708


Location: Maryland
Joined: Jul 24, 2010
Points: 321

Re: Ariens Modified & Repowered 1032 (pics)
Reply #22   Nov 14, 2011 7:56 pm
What did you paint with? Automotive paint or something else?
borat


Joined: Nov 10, 2007
Points: 2692

Re: Ariens Modified & Repowered 1032 (pics)
Reply #23   Nov 14, 2011 9:00 pm
Very nicely done.  Send those pics to Ariens, AYP, MTD, Simplicity and Toro to give them something to aspire to. 
RedOctobyr


Location: Lowell area, MA
Joined: Nov 5, 2011
Points: 282

Re: Ariens Modified & Repowered 1032 (pics)
Reply #24   Nov 14, 2011 9:59 pm
bus708 wrote:
What did you paint with? Automotive paint or something else?

I would also be interested in any painting info you'd care to share. The fact that the After pics are beautiful, and Before pics show a fair bit of rust, is encouraging. At least that can be addressed if you're willing to take the time, which you obviously did.
manjestic


Location: North Shore, MA
Joined: Oct 31, 2011
Points: 87

Re: Ariens Modified & Repowered 1032 (pics)
Reply #25   Nov 14, 2011 10:36 pm
RedOctobyr wrote:
I would also be interested in any painting info you'd care to share. The fact that the After pics are beautiful, and Before pics show a fair bit of rust, is encouraging. At least that can be addressed if you're willing to take the time, which you obviously did.

Ditto.  Especially for folks like me who don't have access to sand blasting, paint booth, compressed air...  Sounds hopeless when I type that.  Wonder what a sandblasting service costs?
This message was modified Nov 14, 2011 by manjestic
Summerwinds


Simplicity 924i, Toro 3650

Location: Northern Suburbs of Chicago, Illinois
Joined: Dec 3, 2008
Points: 43

Re: Ariens Modified & Repowered 1032 (pics)
Reply #26   Nov 14, 2011 10:55 pm
This is outstanding, a real tribute to your mechanical ingenuity and fabrication skills! A true hot rod snowblower!
jrtrebor


Location: Michigan - 3 hours north of Chicago on the lake
Joined: Feb 10, 2010
Points: 539

Re: Ariens Modified & Repowered 1032 (pics)
Reply #27   Nov 15, 2011 12:13 am
Thanks so much for all you nice comments
Be more that happy to share my painting experiences.  I didn't sandblast the housing even though I have a small blaster.  Just didn't have a compressor at the time to power it.
Blasting is the way to go.  If you can find someone who isn't to expensive.  And knows what they are doing.  You can warp sheet metal if you don't do it right.
I just used a right angle grinder.  Different grit sandpapers and 3m Scotchbrite Surface Conditioning disks. But just sand paper and some good old fashioned elbow grease will do.
I also ground/sanded the off edges off the steel at all the overlapping seam joints. To round the corners. I used automotive Seam sealer or Spot putty to fill in the seams of
those joint.  So as to create a more rounded corner or edge.  Paint will stay on much longer, on a round edge than a squared corner edge.  If you look at the finished photos.
You won't see any gaps or spaces in the paint at the seams on the ends of the blower housing.  You can hardly even see the seams.
I think I probably coated any spots that still looked a little rusty after sanding with a Rust Stopper paint/primer.  Usually you would coat any bare steel with an Self Etch Primer
before applying a primer but I think I skipped that.  (You wouldn't want to do that if you were painting a car).
Everything was then well coated with a Rust-Oleum Red Oxide Primer with Rust Inhibitor.  Great stuff.  It goes on think and fills in small imperfection like rust pits.  Dries fairly quick and can be sanded smooth (if you choose) to give you a nice smooth surface before the top coat.  I believe this is an important step.  That primer really binds to the steel and also gives the top coat something good to bind to as well. The primer will be dry in 20 to 30 minutes or so depending on air temp. and humdity. But I usually call it a day by then and let it dry overnight. 
Before I top coat it, I usually run a green Scotchbrite pad over all the primer to knock of any overspray or little nubs that may be sticking up.  Or I might sand any
really rough spots or orange peel smooth.  Make sure that your hands are clean and any rags you might use are clean as well.  And if you doing this in the summer, even sweat
on your hands can put a slight oil film on the primer that the paint won't want to stick too.  Wipe the whole thing down after sanding with a clean rag to remove any dust.
Or use a clean dry paint brush which also help to get dust out of corners and cracks.
For the top coat I use Rust-Oleums Engine Paint.  "Chevy Orange" not the "Red Orange Chevy orange" they are two different colors.  I've tried quite a few and this paint over
a Red Oxide primer is almost dead on to the Ariens orange.  Any chain auto part store carries it. 
I usually start by giving the entire part a tack coat.  Which is nothing more than a light see through coat.  If the part is small let it sit for a couple of minutes, not long.  If the part is large like a blower housing.  You can finish with the tack coat and go back to where you started and start putting it on thicker to really cover.  But go back and forth over a certain spot until it's covered well.  Don't just spray it on in one continuous spray.
You might get some runs. Spray to the left come back over the same spot going to the right and back again to the left.  It should be completely covered and shiny by the
third trip.  Over lapping each motion and moving downward.  Watch so that the overspray isn't landing on area that you just painted.  I usually work from the top down. 
When you think your finished and your happy with what your seeing.  Stop and look over things real close.  Look for spots where the paint may be a little thin or spots that you missed.
I should clarify something here, I said I usually work from the top down.  I do.  But I usually, as with the blower will put a coat on the bottom of things first.  Places that are going to
be hard to get to with a good coat with out having the blower turned over.  So I do the bottom of things fairly well first.  Then started from the top down.  You don't see the bottom of things anyway.  So just getting a good thick coat on the surface is all your trying to do. If the next day you see a spot you really missed.  Wait a few days before you give it a
heavy coat.  If you try putting on a heavy coat over paint that is still not completely dry.  You can soften up the bottom coat and the paint will wrinkle. 
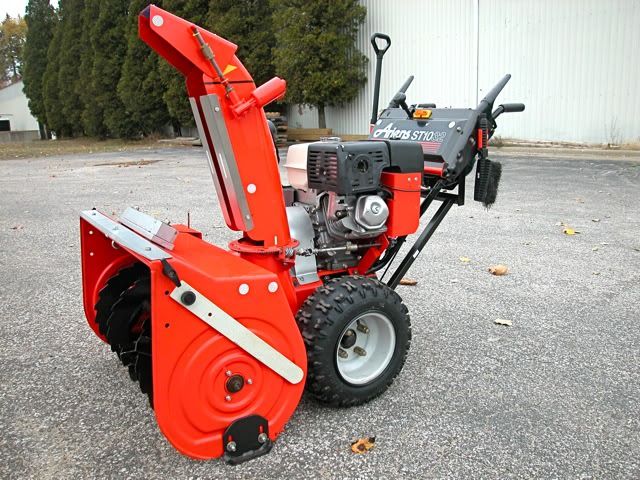
That was the long answer.  It sounds like a lot to go through but it's really not.  You could come close to doing the whole blower in one day.  It's just kind of dirty work.
Short answer
Rust-Oleum Rust stopper primer
Rust-Oleum Red Oxide Primer with Rust inhibitors
Rust-Oleum Chevy Orange Engine Paint.  (Not Chevy Red Orange)
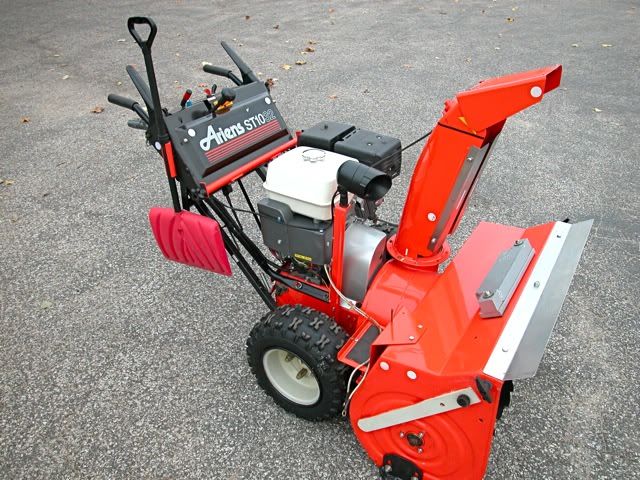
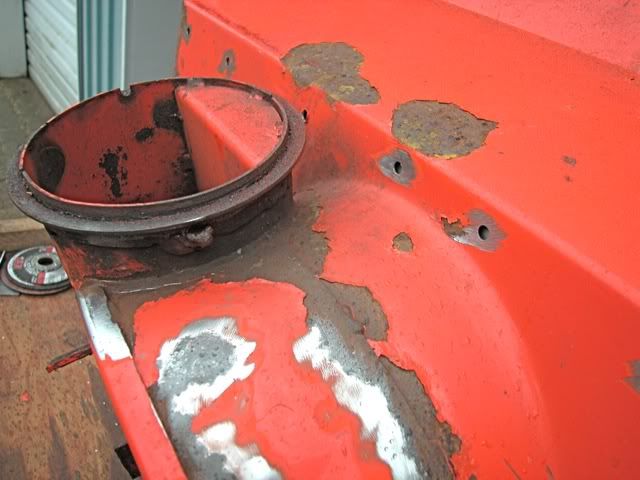
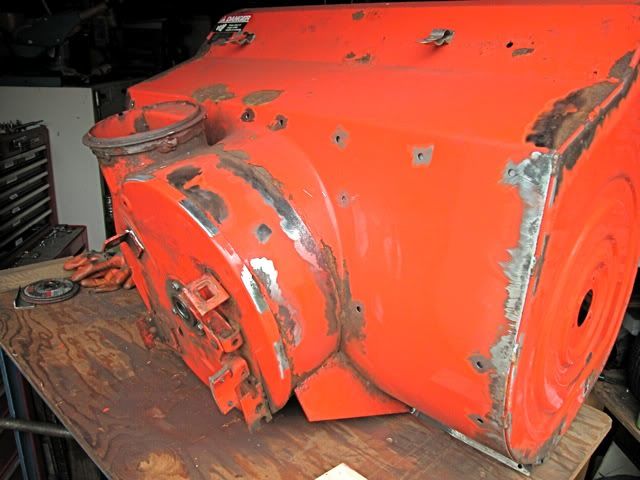

In the begining
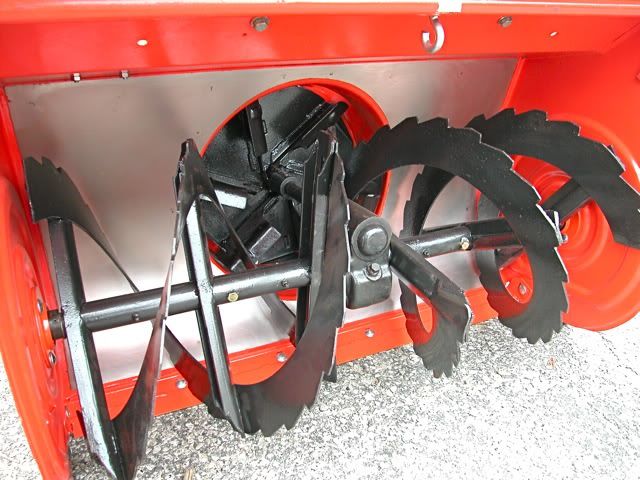
The holes you see were drill so I could plug weld the stainless steel liner in place from the back side.


jrtrebor


Location: Michigan - 3 hours north of Chicago on the lake
Joined: Feb 10, 2010
Points: 539

Re: Ariens Modified & Repowered 1032 (pics)
Reply #28   Nov 15, 2011 12:15 am
sscotsman wrote:
Wow! that is sweeeeet!
very cool..

[quote]Thanks very much, glad you like it.  It's Model # 924084. 
Not really sure what year it is but I believe late Eighties.
[/quote]

I have model 924084 listed as produced from 1992 to 1996.
possibly plus or minus a year.

http://1stclass.mylargescale.com/scottychaos/Ariens/Page7.html

Do you still have the Tecumseh engine you took of it?
if so, the serial number on the engine tag might be able to ID the year of the engine,
which would most likely ID the year of the snowblower..

Scot

No, the engines gone.  But I do still have the engine tag numbers.
bcjm


Location: Washing DC Area
Joined: Dec 2, 2011
Points: 25

Re: Ariens Modified & Repowered 1032 (pics)
Reply #29   Dec 6, 2011 5:05 pm
I found this not so old thread.  Very nice job.  This is exactly what I want to do to fit my Honda GX390 engine.  My snow blower is Arines 924029.  I think we have the same deck size.

Did you drill the new holes on the existing deck to mount the Honda Engine?   Can you secure the bolts from under the deck?  My estimate was that it does not have enough space but apparently you did it.

FrankMA


Location: Merrimack Valley/Northeastern Mass
Joined: Jul 1, 2010
Points: 587

Re: Ariens Modified & Repowered 1032 (pics)
Reply #30   Dec 6, 2011 5:21 pm
jrtrebor: You do some really nice work!

Toro Wheel Horse 522xi GT, Honda HS928TA, Honda HS621AS, Honda HS520A, Toro CCR3000 (work in progress), Honda HS624WA (sold 08/23/2010), Stihl BR550 Backpack Blower, Stihl MS250, McCulloch MS1635, Honda EM6500SX Generator
RedOctobyr


Location: Lowell area, MA
Joined: Nov 5, 2011
Points: 282

Re: Ariens Modified & Repowered 1032 (pics)
Reply #31   Dec 6, 2011 6:37 pm
Yeah, that is a beautiful job.

bcjm, you might also take a look at this thread. Different (older) Ariens blower, and a smaller Honda-clone engine. But perhaps there's some useful info to pull from it. He did discuss some of the challenges he had in mounting the new engine:

http://www.mytractorforum.com/showthread.php?t=216776
Replies: 22 - 31 of 58Next page of topicsPreviousNextNext page of topicsAllView as Outline
Outdoor Power Equipment (Lawn Mowers, Snow Blowers, Chain Saws and more) Guide   •   Discussions  Reviews  
AbbysGuide.com   About Us   Terms of Use   Privacy Policy   Contact Us
Copyright 1998-2024 AbbysGuide.com. All rights reserved.
Site by Take 42