Abby's Guide to Outdoor Power Equipment (Lawn Mowers, Snow Blowers, Chain Saws and more)
Username Password
Discussions Reviews More Guides
Abby’s Guide > Outdoor Power Equipment (Lawn Mowers, Snow Blowers, Chain Saws and more) > Discussions > Repainting a snowblower bucket

Outdoor Power Equipment (Lawn Mowers, Snow Blowers, Chain Saws and more) Discussions

Search For:
aa335


Joined: Nov 29, 2008
Points: 2434

Repainting a snowblower bucket
Original Message   Oct 5, 2010 10:49 pm
I have a 10 year old single stage snowblower that's undergoing a full restoration this winter. I got the snowblower bucket disassembled from the chassis and engine. The bucket has been completely stripped down to bare metal. I want good adhesion and abrasion resistance and I'm willing to put in the time and money to get the best paint job that I can do myself without sending out.

What do you guys recommend for primer and paint? Any preparation techniques in addition to stripping down to bare metal and roughing up the surface?
Replies: 1 - 68 of 68View as Outline
trouts2


Location: Marlboro MA
Joined: Dec 8, 2007
Points: 1328

Re: Repainting a snowblower bucket
Reply #1   Oct 6, 2010 8:00 am
  

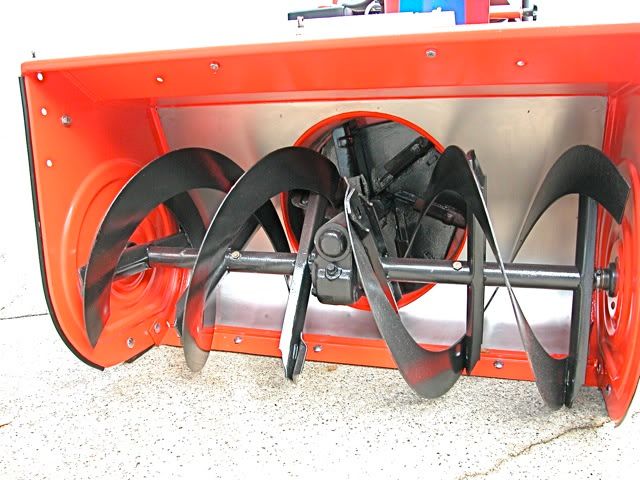
Old 80's large frame Snapper, 10hp 30 inch with one of the industries best cast iron gearboxes, dual running lights, wide tires and and as easy to handle as any current new machine.  Bucket and augers painted.   All bushings and bearings replaced.  It has dash mounted hood and chute controls but lacks auger clutch locking with the drive clutch.  Has a very strong motor and tosses very well with the deere chute.  Machine cost $30 and about $150 in parts.  It's good for another 20 years and the engine probably 10.  It would be a perfect match for any length long driveway. 

Rustoleum primer and paint.  I go two coats of primer and 2-4 on paint.  The two primer are for coverage and some extra protection.  The 2-4 paint is because the reds and oranges do not mask the primer well and require a few coats to hide it.  It’s also for a little added protection. 


Why Rustoleum?  It’s available in lots of colors, cheap and works.  It’s not durable like baked on paint or whatever Ariens used on it’s 70’s machines.  One thing I’d like to try is car clear on top of Rustoleum. 


Depending on what’s painted and how bad or smooth the surface is I use brushed on paint or cans of spray.  It usually works out that the primer and first color coats are brushed on and the last coats sprayed after a very light sanding. 


Getting a paint job to look like a car fender is not possible without a lot of work, the same it would take on a car but since it’s a snowblower I don’t put in too much effort.  When the job is done it looks ok from a distance but up close a hack job.  After one or two times out clearing snow the slight buildup of dried dirt makes the machine looks normal and much better.


For surface prep I get the surface sort of smooth depending on the rust level.  For pocked areas I don’t sand or grind them out.   Various rust preventers are used in hopes they will neutralize the embedded rust.   I’ve had good luck with these:

Evapo-Rust from Harbor Freight.

Rustoleum Rust Reformer, available anywhere.

Navel Jelly, available anywhere.

Must For Rust, available from Home Depot.  They used to carry a decent size hand spray plastic bottle at an ok price but stopped carrying it. 


The rust preventers work about the same with slight differences depending on the rust and type of metal.  They may have to be applied several times with wire brushing.  Again, depending on the type of metal and rust the result can be a gray metal finish, a hard blackened surface or a white coat.  The gray and blackened surfaces are left as is.  The black is a hardened protective coat.  The white will be powder or sometimes very hard.  It can be brushed off.  It’s not required to get all the white off 100% as it can be painted over and bond with the paint. 


The result does not provide great protection from bumps and banging like original paint can take.  I’ve done a lot of touch-up on buckets and a number of full buckets.  The paint does stay on and not lift, at least so far.  I’ve done over a few, sold them and have kept in email contact with the buyers to see how things went.  So far after three seasons the paint has stayed on and looks good.  One machine was a 7hp Simplicity 22 inch that clears a three tenement in Boston.  He stores the machine in the cellar so had to go with a smaller bucket. The machine had great external paint but the bucket inside was nasty so the bucket inside got done.  The drive is a long one car wide that opens in the back of to a fairly big parking lot for the tenants.  It gets a lot of use each storm so a good workout for the paint. 


For me the key for doing this is

1.      Putting up with a non-car like finish as it’s too much work.

2.      Effectiveness of the rust neutralizers.  


Getting a can of car paint is out as it’s very expensive to have a batch mixed up.  The min quantity was a gallon.   I tried Ariens and Toro factory spray cans but they don’t match anything.  With Rustoleum you can get a few quart cans that are close and mix to get a match.  MTD red and Ariens orange have both changed their colors over the years.   The machines also change color over time.  

iLikeOrange


Joined: Nov 18, 2005
Points: 120

Re: Repainting a snowblower bucket
Reply #2   Oct 6, 2010 9:07 am
One technique that I got from a painter for building multiple coats is to apply two coats in succession "wet on wet" meaning apply the second coat while the first is tacky . Let those dry then sand between coats as you normally would. Don't get to crazy with the # of coats as this may be problematic.

I do see some durabilty issues here but good luck.

O


aa335


Joined: Nov 29, 2008
Points: 2434

Re: Repainting a snowblower bucket
Reply #3   Oct 7, 2010 2:10 am
What's the benefit of this technique? I don't see it how it makes the paint finish better, or better adhesion.
DavidNJ


Joined: Sep 26, 2010
Points: 206

Re: Repainting a snowblower bucket
Reply #4   Oct 7, 2010 2:59 am
You don't like Krylon?

I wire brushed mine before I painted using a drill and angle grinder. If I had a sand blasting booth I would have used it. I forget the number of coats, but I thought it came out rather well. It was thicker than the stock paint, but pretty smooth and shiney.

When working on car bodies you use primers with high solids to build up surfaces (e.g. http://www.sherwin-automotive.com/products/show_product.cfm?product=P50)  But as trout2 said, you aren't going to spray a light primer dusting on a dark primer and block sand, fill, and do it again. It is a snow blower not a show car.

aa335


Joined: Nov 29, 2008
Points: 2434

Re: Repainting a snowblower bucket
Reply #5   Oct 7, 2010 3:05 am
Paint finish is secondary. I was looking for durable paint that can take the abrasion of the snow, sand, and the rotating paddles. The original paint was worn off inside the bucket.
DavidNJ


Joined: Sep 26, 2010
Points: 206

Re: Repainting a snowblower bucket
Reply #6   Oct 7, 2010 4:04 am
There is powder coating and epoxy enamels. The latter are used on show and antique car chassis.

http://www.por15.com/Single-Part-Topcoats/products/4/

This message was modified Oct 7, 2010 by DavidNJ
iLikeOrange


Joined: Nov 18, 2005
Points: 120

Re: Repainting a snowblower bucket
Reply #7   Oct 7, 2010 8:13 am
aa335 wrote:
What's the benefit of this technique? I don't see it how it makes the paint finish better, or better adhesion.


Better adhesion as opposed to sanding where you may miss a spot especially  in a tight area. I use this method  painting/coating anything. If time is ever  a factor it also allows faster build up of multiple coats.

JimmyM


Joined: Dec 20, 2009
Points: 82

Re: Repainting a snowblower bucket
Reply #8   Oct 7, 2010 8:51 am
Try Krylon Contractor Primer and Farm and Implement paint.

I know you asked about paints, but powder coating would be the best finish. You could try calling around to different coating shops. See how much it would cost to have them just add your parts to a batch of work they're already doing if an exact color is not all that important.
aa335


Joined: Nov 29, 2008
Points: 2434

Re: Repainting a snowblower bucket
Reply #9   Oct 7, 2010 9:00 am
iLikeOrange wrote:
Better adhesion as opposed to sanding where you may miss a spot especially  in a tight area. I use this method  painting/coating anything. If time is ever  a factor it also allows faster build up of multiple coats.

There's no rush this time.  The snowblower is going to be out commission for the whole winter.  I'm taking it slow to make this paint last another 10 years.  I'm probably going to let it fully cure between coats.
aa335


Joined: Nov 29, 2008
Points: 2434

Re: Repainting a snowblower bucket
Reply #10   Oct 7, 2010 9:44 am
JimmyM wrote:
Try Krylon Contractor Primer and Farm and Implement paint.

I know you asked about paints, but powder coating would be the best finish. You could try calling around to different coating shops. See how much it would cost to have them just add your parts to a batch of work they're already doing if an exact color is not all that important.

Yeah, a few guys at work also recommend powder coating as the ultimate durable finish.  I'll check that out.
friiy


Location: Las Vegas, The Desert
Joined: Apr 12, 2008
Points: 600

Re: Repainting a snowblower bucket
Reply #11   Oct 8, 2010 10:47 am
 I found a "Epoxy Appliance"  paint for stoves and such at home Depot ...  They only had black and White,  but is sure was tuff stuff..(nice gloss too)

Just a note..... we paint and cure things at work from time to time,  I recommed a heat lamp (french fry lamp)  for getting things done in a timely manner. 

Friiy

aa335


Joined: Nov 29, 2008
Points: 2434

Re: Repainting a snowblower bucket
Reply #12   Oct 8, 2010 2:20 pm
DavidNJ wrote:
There is powder coating and epoxy enamels. The latter are used on show and antique car chassis.

http://www.por15.com/Single-Part-Topcoats/products/4/


This stuff looks good.  It's expensive, though.   Although  I'm not going to be using much paint so it may be okay.

I like the Hardnose and Metal Mask versions.
aa335


Joined: Nov 29, 2008
Points: 2434

Re: Repainting a snowblower bucket
Reply #13   Oct 8, 2010 2:27 pm
friiy wrote:
 I found a "Epoxy Appliance"  paint for stoves and such at home Depot ...  They only had black and White,  but is sure was tuff stuff..(nice gloss too)

Just a note..... we paint and cure things at work from time to time,  I recommed a heat lamp (french fry lamp)  for getting things done in a timely manner. 

Friiy


Black is all I need.  Is this a brush on or spray can?
friiy


Location: Las Vegas, The Desert
Joined: Apr 12, 2008
Points: 600

Re: Repainting a snowblower bucket
Reply #14   Oct 8, 2010 5:59 pm
rattle can......

Friiy

whitetail


Joined: Dec 28, 2005
Points: 46

Re: Repainting a snowblower bucket
Reply #15   Oct 9, 2010 11:38 am
One of the best choices is a good self etching primer.can be purchased in auto store and rattle can too.Then top coat .
bus708


Location: Maryland
Joined: Jul 24, 2010
Points: 321

Re: Repainting a snowblower bucket
Reply #16   Oct 10, 2010 2:52 pm
I would go to your local automotive store. They have everthing you need. Strippers, Rust preventing primer, fill primer, epoxy paint, and clear coat. The more clear you put on the better. If you hit a rock it will chip the primer not your paint. A good dealer wiil show you how to mix  and apply everthing. if you want to strip it down to metal you can go to Habor Freight and get a cheap sand blaster. You can get a spray gun too .
GtWtNorth


https://t.me/pump_upp

Location: https://t.me/pump_upp
Joined: Nov 16, 2008
Points: 264

Re: Repainting a snowblower bucket
Reply #17   Oct 11, 2010 9:13 am
I've had good results over the years using Tremclad rust paint. Usually available in a lot of colors. If my wife isn't looking, I'll also slip parts into the oven to bake. It seems to produce a smoother harder surface.  My goal is to remove as much rust as possible and not worry about the smoothness of the final finish except for the inside of the auger housing, where I will spend a bit more time smoothing.

I have also used muriatic acid. That stuff eats rust for breakfast. BUT, be very careful to use all the safety equipment, gloves, old clothes, eye & breathing protection. I usually use it outdoors with a fan to blow the fumes away. You also need to get some primer on asap as things will start to rust almost right away. Oh yeah, store the tightly closed acid container inside another tightly closed container. The fumes from the acid can cause rust on your tools and other exposed metal stored in the same room.

Powder coating would be the way to go, I've had experience trying to sand powder coated parts, very tough stuff.

Cheers
This message was modified Oct 11, 2010 by GtWtNorth


https://t.me/pump_upp
aa335


Joined: Nov 29, 2008
Points: 2434

Re: Repainting a snowblower bucket
Reply #18   Oct 11, 2010 1:21 pm
whitetail wrote:
One of the best choices is a good self etching primer.can be purchased in auto store and rattle can too.Then top coat .

I have stripped the paint down to bare metal with a wire brush.  There were very little surface rust, no pitting, and I have removed all rust.   Would the etching primer improve adhesion?
This message was modified Oct 11, 2010 by aa335
Bill_H


Location: Maine
Joined: Jan 12, 2008
Points: 354

Re: Repainting a snowblower bucket
Reply #19   Oct 14, 2010 1:07 am
Don't powder coat it!

I'm currently restoring a 48" Case Snocaster that will be my primary snow removal machine. After disassembly, I took a look at the inside of the bucket and decided I would not be able to do a really good job with a wirebrush, so last week I took it to a local guy who powder coats professionally, as my compressor is too small. He sandblasts most things before powder coating and has all the equipment for that.

We were discussing the type of finish I should use to get maximum durability and rust protection. He mentioned that he had powder coated a plow for a friend and after 3 years it looked horrible. Powder coat sounds great, it's very hard and very smooth, but it does not penetrate seams at all. What happens is you get a little bit of water in a seam or a scratch elsewhere and you get rust underneath the powder coat, which then peels off. He told me to not even ask him to powder coat it. Since he's a pro, I took him at his word. That night I was googling to see what else I could do and by chance happened across a discussion on an auto body forum where a guy tried having a frame powder coated as part of a restoral project. His story of the powder coat failure matched just what the pro had told me. Powder coating is great but not for everything.

Sandblast it, wirebrush if you can't, clean it, then treat the rust with a phosphoric acid product, then use an epoxy primer. Warning: it's not cheap and you need a spray gun. Then cover with a few coats of enamel with hardener added.

Since I don't have a spray gun and I'm stuck with rattle cans, the epoxy is out. I'll use self etching then hi fill to smooth out the little pits, and rattle can enamel. I'm doing my auger and bucket the same color so I can touch up any scratches as they appear. I don't want to go through this whole process again.

Who the hell let all the morning people run things?
DavidNJ


Joined: Sep 26, 2010
Points: 206

Re: Repainting a snowblower bucket
Reply #20   Oct 14, 2010 4:23 am
Bill_H wrote:
Don't powder coat it!

I'm currently restoring a 48" Case Snocaster that will be my primary snow removal machine. After disassembly, I took a look at the inside of the bucket and decided I would not be able to do a really good job with a wirebrush, so last week I took it to a local guy who powder coats professionally, as my compressor is too small. He sandblasts most things before powder coating and has all the equipment for that.

We were discussing the type of finish I should use to get maximum durability and rust protection. He mentioned that he had powder coated a plow for a friend and after 3 years it looked horrible. Powder coat sounds great, it's very hard and very smooth, but it does not penetrate seams at all. What happens is you get a little bit of water in a seam or a scratch elsewhere and you get rust underneath the powder coat, which then peels off. He told me to not even ask him to powder coat it. Since he's a pro, I took him at his word. That night I was googling to see what else I could do and by chance happened across a discussion on an auto body forum where a guy tried having a frame powder coated as part of a restoral project. His story of the powder coat failure matched just what the pro had told me. Powder coating is great but not for everything.

Sandblast it, wirebrush if you can't, clean it, then treat the rust with a phosphoric acid product, then use an epoxy primer. Warning: it's not cheap and you need a spray gun. Then cover with a few coats of enamel with hardener added.

Since I don't have a spray gun and I'm stuck with rattle cans, the epoxy is out. I'll use self etching then hi fill to smooth out the little pits, and rattle can enamel. I'm doing my auger and bucket the same color so I can touch up any scratches as they appear. I don't want to go through this whole process again.


That was the type of claim made by POR (paint over rust) for auto chassis. It is very common on low-moderate cost restorations (I don't really know the details of high end restorations).
aa335


Joined: Nov 29, 2008
Points: 2434

Re: Repainting a snowblower bucket
Reply #21   Oct 14, 2010 1:13 pm
Looks like I'm leaning towards the epoxy primer and paint option.  Powder coating is tough, but I am concerned about the issues Bill_H just brought up and also proper masking of areas that I don't the powder coating to cover.

Can epoxy paint applied with a brush or foam brush?  I don't want to buy spray painting equipment for this one off project.
chefwong


Joined: Dec 18, 2004
Points: 175

Re: Repainting a snowblower bucket
Reply #22   Oct 27, 2010 10:46 pm
Dare I ask....why go all out when it will just get chipped anyway ? The bottom does scrape no. I would prime, paint, paint and then clear. Maybe wetsand and add some Weatherpruf just to top things off. When the season is over, the bottom where there is minor scrapes, just scuff, sand, prime and touch up spray. I get the whole resto. thing but the duty of a SB will inevitably get chips. FWIW, a decent powdercoater will be able to mask what you want...
aa335


Joined: Nov 29, 2008
Points: 2434

Re: Repainting a snowblower bucket
Reply #23   Oct 27, 2010 11:13 pm
The old girl is going into retirement as a garage queen, only to come out on nice warm days to blow powder snow.  No salt, no sand, no slush, just fresh fallen pure snow. 

There will be a younger, better, and faster one to take on her duty.   I just couldn't bear to let the old girl rust, she's going to age gracefully.

That's my story and sticking with it. 
This message was modified Oct 27, 2010 by aa335
starwarrior


Joined: Oct 27, 2010
Points: 91

Re: Repainting a snowblower bucket
Reply #24   Nov 3, 2010 2:28 pm
Hey There

Imron is an epoxy paint made by Dupont and is what airplanes are painted with.

The stuff  is tough as nails as long as you prep correctly and is readily available at pretty much any automotive paint supply.

The only caviat is once you mix it you have to use it up in about an hour because it dries exactly like a two part epoxy.

Also you need a mask that takes in outside air. You can't inhale this stuff  when you are spraying. It will kill ya. 

Starwarrior

aa335


Joined: Nov 29, 2008
Points: 2434

Re: Repainting a snowblower bucket
Reply #25   Nov 3, 2010 4:23 pm
How is this applied?  Brush or spray?
GtWtNorth


https://t.me/pump_upp

Location: https://t.me/pump_upp
Joined: Nov 16, 2008
Points: 264

Re: Repainting a snowblower bucket
Reply #26   Nov 4, 2010 12:15 am
I am also looking at a tough product to use to repaint my bucket, but this stuff sounds real nasty and not to be used casually unless you take a lot of precautions. Read what this fellow has to say.

http://www.bronkalla.com/upkeep/spray_imron.htm

A quick look at the MSDS for Imron on the Dupont site reinforces what he says.

Cheers

https://t.me/pump_upp
starwarrior


Joined: Oct 27, 2010
Points: 91

Re: Repainting a snowblower bucket
Reply #27   Nov 4, 2010 8:50 am
OK, I specifically stated spray in my comment so I am getting  the impression that you did not read the entire message.

Imron is serious stuff and definately not for the novice painter. The safety precautions are extremely important.

If you accidentally  breathe the overspray it will epoxy your lungs.

My suggestion is to take your item to a local auto body shop and have it painted.

A good shop will have know how to apply Imron and you will not hurt yourself or anyone else in the process.

They don't have too many colors to choose from because it is very special purpose paint but it will wear like iron.


This message was modified Nov 4, 2010 by starwarrior
aa335


Joined: Nov 29, 2008
Points: 2434

Re: Repainting a snowblower bucket
Reply #28   Nov 4, 2010 9:07 am
starwarrior wrote:
OK, I specifically stated spray in my comment so I am getting  the impression that you did not read the entire message.

Yes, read the entire message.  I was in a hurry and just glossed through that one word about spray. 

I just asking if it can be applied by other method in addition to spray.

Anyways, this stuff sounds serious, I'm not going to attempt to do it at home.  Not worth all the risk.  Thanks for the info though.
jimbedro


Location: Maynard MA
Joined: Feb 20, 2009
Points: 52

Re: Repainting a snowblower bucket
Reply #29   Nov 4, 2010 8:19 pm
Imron is polyurethane not epoxy. itisnot quite as hard but equally as hazardoues. it contains isocynates which are a form of cynanide. You need a full suit with an air supply t oprotect yourself.
jrtrebor


Location: Michigan - 3 hours north of Chicago on the lake
Joined: Feb 10, 2010
Points: 539

Re: Repainting a snowblower bucket
Reply #30   Nov 5, 2010 8:48 am
I would agree, that powder coating is not a good solution for snow blower buckets. It is an extremely durable coating. But power will not get into the corners and seams due to what is called the Faraday Cage Effect. I recently restored the bucket on my Ariens 1032. I used automotive Seam Sealer where ever there was any type of joint or seam. This stuff gives you a very well sealed and water tight joint. You then prime and paint over it. Unless all the sheet metal joints are water tight it doesn't matter what type of coating you apply. Eventually rust will start in the joint and spread underneath the coating popping it off. That can happen in just one season. And salt can accelerate that process.
aa335


Joined: Nov 29, 2008
Points: 2434

Re: Repainting a snowblower bucket
Reply #31   Nov 5, 2010 9:40 am
I'm getting impatient with paint stripping process.  The snowblower auger housing is 95% stripped down to bare metal.  There are a few areas and tight corners that needs some manual sanding.  Last night, I was thinking I should start with the primer coat.  Upon reading last post about sealing the seams, I'm reconsidering doing that before laying down first coat of primer.   The problem now is with the metal exposed and nicely sanded, it looks too beautiful to cover it up with paint again, I'm thinking just to clear coat it.  :)  Of course, this nice and clear coat is not hold up well. 

Anyone ever gone with the bare metal look on their snowblower?  Protected metal of course.
chefwong


Joined: Dec 18, 2004
Points: 175

Re: Repainting a snowblower bucket
Reply #32   Nov 5, 2010 9:46 am
120 Grit
220 Grit
Nikkens 1000 Grit
Nikklens 1500 Grit
Nikeens 2000 Grit
My preferred Metal Polish - Heavy Metal Polish Green Cut
Followed by their Blue Cut

Clear Coat Twice Per Season. Once before and Once After.


It will be truly something special ;-)
jrtrebor


Location: Michigan - 3 hours north of Chicago on the lake
Joined: Feb 10, 2010
Points: 539

Re: Repainting a snowblower bucket
Reply #33   Nov 5, 2010 8:07 pm
Here is a photo of my blower housing.  Using the Seam Sealer, primer and paint.
I also lined the housing with a piece of stainless steel and inside the impeller housing as well.
Lengthened the impeller blades with weld and then ground them to shape.
I now have only a 1/16 + clearance in the housing.
Really curious to see how that effects the blowing capabilities especially with the wet slushy stuff.
This is an Ariens 32" bucket on a Model 924084 / 1032 blower.


This message was modified Nov 5, 2010 by jrtrebor
aa335


Joined: Nov 29, 2008
Points: 2434

Re: Repainting a snowblower bucket
Reply #34   Nov 5, 2010 8:21 pm
Nice work, I like that stainless steel lining.
jrtrebor


Location: Michigan - 3 hours north of Chicago on the lake
Joined: Feb 10, 2010
Points: 539

Re: Repainting a snowblower bucket
Reply #35   Nov 5, 2010 8:41 pm
A few other modifications I've made ( I get carried away sometimes with ideas)
Adapted power seat screw motors for moving the deflector and rotating the chute.
Both movements are controlled by a little 4-way joystick located on the right handle.
The system is powered by a 12v scooter battery which hangs in a bag below
the control panel.  It has a plug so I can just remove it and take it inside to charge.
Although last year here in Mi. It didn't leave the blower to be charged until
March.  And I only took it in to charge it because I thought I should.
It hadn't shown signs of getting weak at all.
I was amazed at that.
Also took off the old rounded deflector and made a new one with
square corners


This message was modified Nov 5, 2010 by jrtrebor
aa335


Joined: Nov 29, 2008
Points: 2434

Re: Repainting a snowblower bucket
Reply #36   Nov 6, 2010 12:15 am
Very nice work.  The chute deflector motor set up looks highly similar to the new Deere 1330SE. 

By the way, what's the yellow triangle on the chute?
This message was modified Nov 6, 2010 by aa335
Shryp


Location: Cleveland, OH
Joined: Jul 26, 2010
Points: 532

Re: Repainting a snowblower bucket
Reply #37   Nov 6, 2010 4:39 am
aa335 wrote:
Very nice work.  The chute deflector motor set up looks highly similar to the new Deere 1330SE. 

By the way, what's the yellow triangle on the chute?

He uses the triangle to judge how far the deflector can move because the seat motors don't have limiters and he doesn't want to break it.

I remember seeing a video on youtube about hit setup a while ago.
GtWtNorth


https://t.me/pump_upp

Location: https://t.me/pump_upp
Joined: Nov 16, 2008
Points: 264

Re: Repainting a snowblower bucket
Reply #38   Nov 6, 2010 10:20 am
jrtrebor, nice job on the painting, how did you fasten the stainless into the housing? Those seat motors look nice & compact & plenty powerful. What car are they from & do they turn fast enough?
I have a larger joystack from an arcade game that I will hook up to both motors.

chefwong, please don't take this the wrong way, but unless you are building a show (not snow) machine, 1000 & 2000 grit sounds like way overkill. Aren't you giving yourself a lot of work for minimal return.

Cheers


https://t.me/pump_upp
aa335


Joined: Nov 29, 2008
Points: 2434

Re: Repainting a snowblower bucket
Reply #39   Nov 6, 2010 11:15 am
chefwong wrote:
120 Grit
220 Grit
Nikkens 1000 Grit
Nikklens 1500 Grit
Nikeens 2000 Grit
My preferred Metal Polish - Heavy Metal Polish Green Cut
Followed by their Blue Cut

Clear Coat Twice Per Season. Once before and Once After.


It will be truly something special ;-)


Somehow I suspect these sandpaper are expensive and are made in Europe. Never heard of Nikklens before but it sure sounds expensive.
jrtrebor


Location: Michigan - 3 hours north of Chicago on the lake
Joined: Feb 10, 2010
Points: 539

Re: Repainting a snowblower bucket
Reply #40   Nov 6, 2010 8:49 pm
aa335
The other poster is correct.  It gives me a visual reference on how far up the deflector can go.
Here is a link to the video that I made last year.
http://www.youtube.com/watch?v=qwbfkLuhdhw
This message was modified Nov 6, 2010 by jrtrebor
jrtrebor


Location: Michigan - 3 hours north of Chicago on the lake
Joined: Feb 10, 2010
Points: 539

Re: Repainting a snowblower bucket
Reply #41   Nov 6, 2010 9:15 pm
GtWtNorth
I drilled 1/4 " holes in the blower housing. And then Plugged welded the stainless to the housing from the back side.  That way I didn't have to use stainless wire or do any sanding on the stainless to smooth out any welds. Plug welding it also allowed me to get the sheet welded in place good and tight against the housing.  The heat did discolor the stainless at all the weld points.  So I had to use some 400 grit paper to remove them.  After that I bead blasted the entire piece.  Before I welded it in place I primed the steel behind it real well with Red Oxide primer and ran a bead of seam sealer along the edges of the hole cut out and the sides of the sheet.  I didn't want any water getting between the two pieces of metal.  Not only because of rust forming, but I was concerned that if enough water got trapped and froze it could, (I thought) possibly cause the stainless to bulge or pucker out in places. That would not be good.

I don't know what kind of car they came out of.  I found a seat laying in the bed of a pick up which had the two motors in it.  Someone did all the heavy work taking the seats out of something.  I just had to remove the motors and wiring.  I think the speed they turn is just about right. Not to slow and not to fast.
This message was modified Nov 6, 2010 by jrtrebor
chefwong


Joined: Dec 18, 2004
Points: 175

Re: Repainting a snowblower bucket
Reply #42   Nov 7, 2010 8:11 am
aa335....are you planning to adapt a skid shoe on it ?

I am debating whether to drill into the stock sides, add a skid shoe, bolt, fender washer and nut on it....

I can't say for all the Toro models, but on my 1800 I had about 10 year ago, they even employed a skid shoe of some variant so that that would take the wear and not the bottom housing.

???????
I may just buy the wheeled ones from Snowblowers Direct and Adapt it to the HS520.
aa335


Joined: Nov 29, 2008
Points: 2434

Re: Repainting a snowblower bucket
Reply #43   Nov 7, 2010 8:58 am
Chefwong,

I'm not planning to put skid shoes on the single stage snowblower.   I have to dig real hard to find reasons to go through all that trouble.  I prefer no skids if possible to get that nice and straight wall of snow.

I have the side heavy duty skid shoes on the 2 stage snowblower.  It was installed last year, had to drill holes and installed reinforcing plate that came with the kit.  Since you have a 624, your skid shoes may be L-shaped and attached behind the bucket.  This arrangement makes it easier to steer.  Try it out before you put on the side skids though.  I will see if I can find my old posting on my experience with it.

I'm not sure if you will gain anything with side skids since your snowblower bucket is as wide as the sides of the wheels. 
This message was modified Nov 7, 2010 by aa335
aa335


Joined: Nov 29, 2008
Points: 2434

Re: Repainting a snowblower bucket
Reply #44   Nov 7, 2010 9:13 am
jrtrebor wrote:
aa335
The other poster is correct.  It gives me a visual reference on how far up the deflector can go.
Here is a link to the video that I made last year.
http://www.youtube.com/watch?v=qwbfkLuhdhw

Great video, thanks for taking time to record that.  I would have done it differently for the marking.  I would make it visible only when you have approached the limits.
chefwong


Joined: Dec 18, 2004
Points: 175

Re: Repainting a snowblower bucket
Reply #45   Nov 7, 2010 9:13 am
Actually the has 724 both the rear and side skids.

On the SS, the bottom of the bucket just rests on the floor/scrapes.
Similar to a scraper bar, I was thinking to adapt a skid shoe on it.
This would be my replaceable wear item......in theory, the metal on the bucket would never scrape.

The metal bar that is right behind the bucket, under the engine.
I assume used for *lift support* if one needed to lift it for transport .
I used my good 'ole standby Scoth 35 and wrapped it a couple of times. I then lined it with 3/8 Armaflex insulation.
This is another part I know wears/scrapes easily due to design of location

-----

A thought came to me. Let me swing it to my tuning guy....and just have him weld a small piece of SS bar to it.
Problem Solved.
This message was modified Nov 7, 2010 by chefwong
aa335


Joined: Nov 29, 2008
Points: 2434

Re: Repainting a snowblower bucket
Reply #46   Nov 7, 2010 9:26 am
chefwong wrote:
Actually the has 724 both the rear and side skids.

On the SS, the bottom of the bucket just rests on the floor/scrapes.
Similar to a scraper bar, I was thinking to adapt a skid shoe on it.
This would be my replaceable wear item......in theory, the metal on the bucket would never scrape.

The metal bar that is right behind the bucket, under the engine.
I assume used for *lift support* if one needed to lift it for transport .
I used my good 'ole standby Scoth 35 and wrapped it a couple of times. I then lined it with 1/2 Armaflex insulation.
This is another part I know wears/scrapes easily due to design of location

-----

A thought came to me. Let me swing it to my tuning guy....and just have him weld a small piece of SS bar to it.
Problem Solved.

That metal bar is sort of like a kick stand.  It's for tipping the snowblower back and draining the oil from the engine.  I also use it to keep the bucket off the ground after snowblowing.
This message was modified Nov 7, 2010 by aa335
jrtrebor


Location: Michigan - 3 hours north of Chicago on the lake
Joined: Feb 10, 2010
Points: 539

Re: Repainting a snowblower bucket
Reply #47   Nov 7, 2010 8:18 pm
aa335
Actually the only reason I use the triangle marking is to give me a heads up as to how close I'm getting to the stop point.
I blow some city sidewalks for a merchant.  It's an L shaped walk at an intersection with two cross walk ramps. So there are a lot of places I can't blow snow when clearing the walks. Like into the streets. You aren't allowed to do that. I can only put it in a pile on the grass between the walk and the street.  Or in piles at the corners.
 I'm constantly moving and never stop to make chute or deflector adjustments.  Sometimes I may be tuning
the blower around while blowing snow.  So the triangle helps me know in advance where I'm at. 
While I'm watching the pavement then moving the chute direction then the snow angle.  So I'm not blowing into the street or over a pile into the street.  Or on to a parked car or knocking down some sweet old lady and covering up her dog.  With the joy stick I sometimes have a lot of things going on at once.
chefwong


Joined: Dec 18, 2004
Points: 175

Re: Repainting a snowblower bucket
Reply #48   Nov 8, 2010 7:51 am
Vac type oil container for me for OPE equipment. For most of my cars, depending on application or frequency of use, I still do the pan bolt method...
But yes, the vac drains get 99% and it's no MESS. Just even looking at my 724 and they made a overhand drip edge (metal bent 90 degrees), I yesterday did a oil change on that via the vac method.
Not a drip on the floor...

Definately something worth investing
aa335


Joined: Nov 29, 2008
Points: 2434

Re: Repainting a snowblower bucket
Reply #49   Nov 8, 2010 9:17 am
My car doesn't have a dipstick so the vac method is out.  Still do the old fashion drain through the oil pan.  As careful as I can be, there is always at least 3 drops landing on the floor.  Arggh.
Underdog


Joined: Oct 18, 2008
Points: 332

Re: Repainting a snowblower bucket
Reply #50   Nov 9, 2010 11:58 pm
jrtrebor wrote:
aa335
The other poster is correct.  It gives me a visual reference on how far up the deflector can go.
Here is a link to the video that I made last year.
http://www.youtube.com/watch?v=qwbfkLuhdhw


What is the best type of auto seat motor to use for this type of application.  I'm tired of bending over to turn my snowblower chute and I would like to give this idea a try.

aa335


Joined: Nov 29, 2008
Points: 2434

Re: Repainting a snowblower bucket
Reply #51   Nov 10, 2010 12:53 am
The snowblower bucket painting is underway.  Put on a primer coat last night.  Today, I just put on the first coat of black paint, Rustoleum Appliance Epoxy.  Looking good so far.
jrtrebor


Location: Michigan - 3 hours north of Chicago on the lake
Joined: Feb 10, 2010
Points: 539

Re: Repainting a snowblower bucket
Reply #52   Nov 11, 2010 8:39 am
Underdog
Don't know that there is a "best type" of seat motor to use.  It's more about finding one that will work and adapt easily to your blower.  Don't know what type you have. Most if not all
have some sort of crank to turn the chute.  You will need at least one universal joint in the connection between the motor and the drive screw.  Figuring out where and how to mount the motor is the first and most complicated step.  The seat motor has to have some type of mounting points that you can use to mount it on your blower.  What kind of blower do you have?
Underdog


Joined: Oct 18, 2008
Points: 332

Re: Repainting a snowblower bucket
Reply #53   Nov 11, 2010 11:59 am
I did price out paint from a body shop last year. It was $25 for a pint but I have no sprayer. You can also have the auto body shop custom mix the colors and put them in a spray can (rattle can) for about $25.00.  That still seems pricey.
This message was modified Nov 11, 2010 by Underdog


aa335


Joined: Nov 29, 2008
Points: 2434

Re: Repainting a snowblower bucket
Reply #54   Nov 11, 2010 12:21 pm
$25 is too much for paint, and I don't have a sprayer.  I got everything including primer and paint in cans for less than $25 already.  I got the appliance epoxy which seems pretty hard and durable.  Hopefully it doesn't chip off too easily
friiy


Location: Las Vegas, The Desert
Joined: Apr 12, 2008
Points: 600

Re: Repainting a snowblower bucket
Reply #55   Nov 12, 2010 12:13 pm
I know a guy with a fiberglass shop.... He sprays 85 percent of his coats with the cheapie guns from Harbor freight...... He likes the ones that use the Dixie Cups for small jobs and small clean up.. Friiy
aa335


Joined: Nov 29, 2008
Points: 2434

Re: Repainting a snowblower bucket
Reply #56   Nov 12, 2010 2:12 pm
You perked my interests, I just look up HVLP spray set from Harbor Freight for less than $100.  Very compact and doesn't require a separate compressor.
This message was modified Nov 12, 2010 by aa335
Underdog


Joined: Oct 18, 2008
Points: 332

Re: Repainting a snowblower bucket
Reply #57   Nov 13, 2010 7:17 pm
aa335 wrote:
You perked my interests, I just look up HVLP spray set from Harbor Freight for less than $100.  Very compact and doesn't require a separate compressor.


There are two different HVLP spray systems listed at Harbor Freight for around $100.  Is this model that one you picked up (Chicago Electric 66297)? I would curious to know how it works out. I have a few things I'd like to paint.


Or is this second one the one below?

This message was modified Nov 13, 2010 by Underdog


aa335


Joined: Nov 29, 2008
Points: 2434

Re: Repainting a snowblower bucket
Reply #58   Nov 15, 2010 1:55 pm
I was interested in the second spray system.    I didn't buy it but I finished up the job with spray paint instead. 
Bill_H


Location: Maine
Joined: Jan 12, 2008
Points: 354

Re: Repainting a snowblower bucket
Reply #59   Nov 16, 2010 10:27 pm
aa335 wrote:
 I finished up the job with spray paint instead. 

It's all done? Can we get pics?

BTW, this is mine that I'm currently working on: http://www.mytractorforum.com/showthread.php?t=154484   It's all stripped and needs a bit more grinding. I may have to weld in a piece at the bottom of the bucket, not sure until I grind away all the rust. If there's no perforations, I'll use epoxy to re-level the area instead. It's not in a stress or wear area, it just has to be smooth.  This is a 20+ year old 48" single stage, the auger gets spun at 900 RPM by a 21HP engine.
This message was modified Nov 16, 2010 by Bill_H


Who the hell let all the morning people run things?
GtWtNorth


https://t.me/pump_upp

Location: https://t.me/pump_upp
Joined: Nov 16, 2008
Points: 264

Re: Repainting a snowblower bucket
Reply #60   Nov 17, 2010 7:11 am
Bill_H wrote:
It's all stripped and needs a bit more grinding. I may have to weld in a piece at the bottom of the bucket, not sure until I grind away all the rust. If there's no perforations, I'll use epoxy to re-level the area instead. It's not in a stress or wear area, it just has to be smooth. 

Bill,   Can you give some more details on your use of epoxy to "level" the area. My ST8-24 is still very solid, but has some serious pitting on the inside of the chute & auger housing. I'm considering my options to smooth them out as much as possible. Has anyone ever used bondo successfully in these areas?

Cheers

https://t.me/pump_upp
aa335


Joined: Nov 29, 2008
Points: 2434

Re: Repainting a snowblower bucket
Reply #61   Nov 17, 2010 10:52 am
Bill_H wrote:
It's all done? Can we get pics?


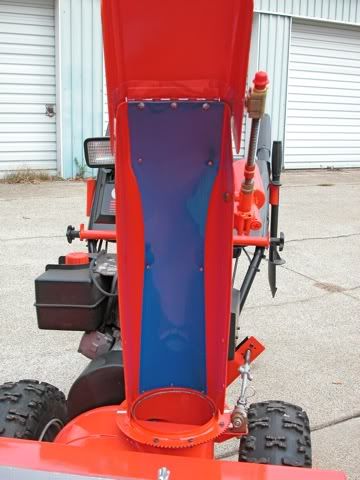
It's put back together ready to blow snow.  It's looking good now.  However, there are various other details that the perfectionist in me just have to do before I'm satisfied.  I'm ordering some decals and various hardware pieces such as new wheels, washers, and clips to bring it up 100% functional as new. 

I'm thinking about lining the inside of the discharge chute with teflon sheets but debating whether I should drill holes and rivet it in place.  I want it to be as close to original and not butchered up.  There are adhesive backed sheets but not sure if that will remain sticky in the cold weather.  Maybe I'll just repaint inside the chute and clear coat.  I will wet sand and respray the clearcoat yearly to replenish the worn clearcoat layer.

Probably wet sand the red plastic cover too, put on another coat of red paint, and then seal it with clearcoat.  I got both kinds of clearcoat, the satin and gloss.  Not sure which one to go with.

I'll post pictures when I'm all done.  Stay tuned.
This message was modified Nov 17, 2010 by aa335
Bill_H


Location: Maine
Joined: Jan 12, 2008
Points: 354

Re: Repainting a snowblower bucket
Reply #62   Nov 17, 2010 12:09 pm
GtWtNorth wrote:
Bill,   Can you give some more details on your use of epoxy to "level" the area. My ST8-24 is still very solid, but has some serious pitting on the inside of the chute & auger housing. I'm considering my options to smooth them out as much as possible. Has anyone ever used bondo successfully in these areas?

Cheers

I don't know about Bondo. I'm sure it would work but would it scratch off too easily?

I have a some fiberglass supplies I purchased for an auto body job left over and if I don't use it I'll probably end up tossing it. I discovered from some I spilled on the garage floor that the epoxy is incredibly hard and clings very well - it's still there. So I'm going to mix some up and smooth it on then sand it down. Sort of like expensive Bondo :D Time will tell how well it wears, I'm pretty sure it will be good enough. My original plan was to fill in with weld, but that'll take forever.

Who the hell let all the morning people run things?
chefwong


Joined: Dec 18, 2004
Points: 175

Re: Repainting a snowblower bucket
Reply #63   Nov 17, 2010 7:13 pm
I would leave the plastic alone....u need the right flex agents in the paint in order for it to stay well on the cover.

But do wetsand in between coats on metal just to keep the paint ~flat~.

I've been eyenalling things here and there before making my master parts list.
As much as I love mailorder...I hate paying $7 minimum to get a $3 part so I prefer to order all my parts in one shot.
.
aa335


Joined: Nov 29, 2008
Points: 2434

Re: Repainting a snowblower bucket
Reply #64   Nov 17, 2010 7:55 pm
Too late, the paint is already on the plastics.  I've used Krylon Fusion paint for plastics.  They didn't say anything about flex agents being present in the paint, but only that's made to bond to plastics.  We'll see how well it holds up.  If it flakes off, I'll just sand it back down to plastic and sand it smooth to a polish shine.  The plastic has red colorant in it so with a good buff, it will probably look pretty good.
This message was modified Nov 17, 2010 by aa335
jrtrebor


Location: Michigan - 3 hours north of Chicago on the lake
Joined: Feb 10, 2010
Points: 539

Re: Repainting a snowblower bucket
Reply #65   Nov 17, 2010 10:14 pm
aa335
If your still considering lining your chute.  Here is a photo of how mine turned out.  I couldn't line the whole inside it wouldn't lay at all flat because of the contours of the chute.  But from seeing where the paint wears off on the inside of the chute previous years.  That center portion seems to be the track where the greatest amount of snow flow and snow velocity takes place.  The material is part of a kids roll up sled.  Believe it was called a "Wacky Carpet".  We'll see how it works. 
The rest of the inside of the chute will get sprayed down with coat of "Fluid Film"

trouts2


Location: Marlboro MA
Joined: Dec 8, 2007
Points: 1328

Re: Repainting a snowblower bucket
Reply #66   Nov 18, 2010 7:38 am
Borat lined his chute and posted about it (below). I looked around for slippery liners (eastern Mass) but could not find any. Wire brushing, sanding and painting chutes with gloss Rustoleum makes a decent surface. That seems to help but with nasty wet conditions there was still buildup especially on the old shorter chutes that have a sharp leaning angle as opposed to the taller chutes where the angle is much more gradual. Sprays like WD-40 seem to get ripped off very quickly so not very helpful. Borat: I have no snow sticking anywhere. Even wet snow doesn't stick enough to cause any effect on the efficiency of the machine. If it's real sticky, it will stick a bit to the side of the intake housing and maybe a bit will adhere to the gear case but that's about it. Never get enough of a build up to make a difference. As mentioned, the chute is lined with a piece of Krazy Karpet or whatever it's called now. That stuff is very durable. It's on it's third season now and looks like it has lots of life left in it yet. It's showing a bit of scuffing but that's to be expected with all the gravel and sand thats mixed in with the end of driveway deposit. It's a bit of work to make and install, but hey, if it lasts ten years or more and saves damage to the chute, it's worth it.
chefwong


Joined: Dec 18, 2004
Points: 175

Re: Repainting a snowblower bucket
Reply #67   Nov 20, 2010 10:17 pm
I look forward to your writeup. Curious what did you end up replacing.....
And yes, I have to have matching OEM paint for the chute as well....

I just joined the GX160 club myself today.
Aside from missing one front cover bolt, def. needs a overhaul on scraper, paddles and belt, I think I just may spring for new wheels and cotter pins..

The housing is not that beat, and would just benefit from a coat or two of fresh paint.
I think I'll just taking the basic necessities and deal with the overhaul another day....
It's probably just a extra 1/2 hour to remove the auger and probably easier swapping out the paddles which would allow me to spray.....both the sides and onside the bucket.
aa335


Joined: Nov 29, 2008
Points: 2434

Re: Repainting a snowblower bucket
Reply #68   Nov 21, 2010 12:09 am
Thanks for all your help.  Please note that I have started a new topic on this subject with a few pictures added.   Please follow this link:

Honda HS621 Refesh
This message was modified Nov 21, 2010 by aa335
Replies: 1 - 68 of 68View as Outline
Outdoor Power Equipment (Lawn Mowers, Snow Blowers, Chain Saws and more) Guide   •   Discussions  Reviews  
AbbysGuide.com   About Us   Terms of Use   Privacy Policy   Contact Us
Copyright 1998-2024 AbbysGuide.com. All rights reserved.
Site by Take 42