Abby’s Guide > Outdoor Power Equipment (Lawn Mowers, Snow Blowers, Chain Saws and more) > Discussions > Home made impeller kit
Outdoor Power Equipment (Lawn Mowers, Snow Blowers, Chain Saws and more) Discussions |
|
toolmantr
Location: North Andover, MA
Joined: Jan 15, 2008
Points: 9
![]()
|
 |
Re: Home made impeller kit
Reply #1 Dec 4, 2008 5:43 am |
|
Why not mount the rubber below the impeller? Then there would be no need to bevel the plate.
|
friiy
 
Location: Las Vegas, The Desert
Joined: Apr 11, 2008
Points: 600
![]()
|
 |
Re: Home made impeller kit
Reply #6 Dec 4, 2008 12:28 pm |
|
ok...ok... Now that you are all done shaking each other's hands... I think the X-prize should go to the guy that builds a sweet handlebar heat system and posts .. (Borat, my money is on you..) Friiy |
GtWtNorth
https://t.me/pump_upp
Location: https://t.me/pump_upp
Joined: Nov 15, 2008
Points: 264
![]()
|
|
|
Re: Home made impeller kit
Reply #7 Dec 4, 2008 12:54 pm |
|
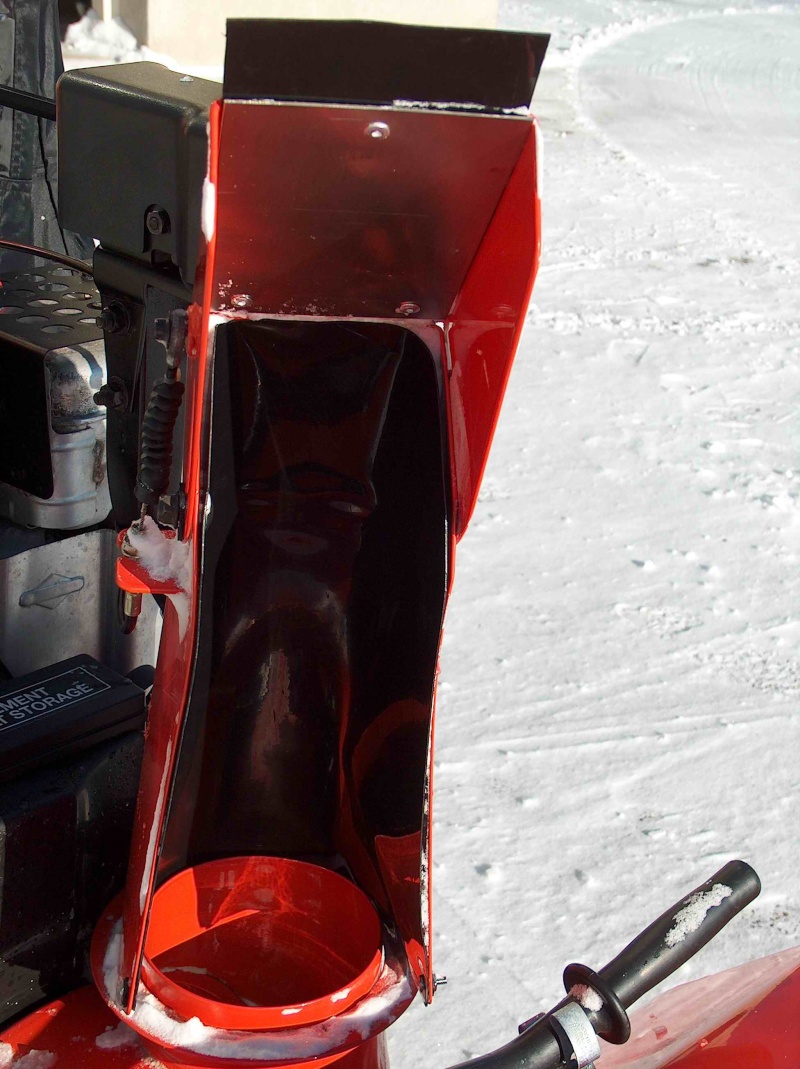
Thanks for the comments, I'm doing a refurb on a 1988 Mastercraft (MTD) 5/24, with a Tecumseh motor. A buddy at work gave it to me 3 months ago and she was suffering from severe maintenance deprivation. Axel & auger bushings worn oval by at least 3/8, drive chains & other mechanisms almost seized up, and of course the usual steel bolts replacing the auger shear pins. Other than that she was pretty solid and the motor ran. I'm in the process of putting her back together now. She's not big or powerful, but at the price it seemed like a good gamble and I can manoeuvre her around the cars, walkways etc. The reason I installed the kit on the front is for none of the above reasons. I had a hard time figuring how to do it , because if you look at the photo below, you can see the trailing edge of the impeller has a lip bent back away from the direction of rotation. I suppose I could have used some kind of spacer and installed it on the back any way. I also toyed with the idea of getting a torch & heating up that lip and straightening it out enough to eliminate most of the 3/8 gap, but this was easier to do. Is this a standard auger shape or are most of them flat?  Borat, the crazy carpet liner is a great idea, but my chute is already made of plastic. But, I will steal your idea of adding the washers to the chute bolts if you don't mind. I'm also working on an electric chute rotation system based on some others I've seen on the web. Cheers
This message was modified Dec 4, 2008 by GtWtNorth
https://t.me/pump_upp
|
borat

Joined: Nov 9, 2007
Points: 2692
![]()
|
|
|
Re: Home made impeller kit
Reply #8 Dec 4, 2008 1:58 pm |
|
ok...ok... Now that you are all done shaking each other's hands... I think the X-prize should go to the guy that builds a sweet handlebar heat system and posts .. (Borat, my money is on you..) Friiy
To quote Kim Jong Il, in the movie "Team America - World Police" when speaking to the leader of a middle east terrorist group: " Do you have any idea how f_____g busy I am????" 
I'm presently restoring, rebuilding, modifying a 1974 Yamaha RD350. I've taken the old electrics out of it and replaced them with state of the are electronic charging and ignition systems. Maybe I can use the generator, rectifier and regulator from it to make handle bar heating system. Won't help anyone on this forum unless they have access to the same parts. All kidding aside, If I recall correctly, I think the B&S and maybe even the Tecumseh engines have a spare wire that runs from its electrical generator. One might be able to tap into that for an electrical source. At the very least, the wire to the light could be used I suppose. My biggest concern is whether the engines on machines not equipped with handle bar heaters produce enough power to run a pair of handle bar heaters without depriving the ignition system of it's needs. The heaters themselves are out there and readily available. One can go to any snowmobile shop and buy a pair of handle bar heaters for around $20.00. Not sure if the diameter would be big enough to fit a snow thrower. Easy enough to find out though. If the engine's electrics produce enough juice and the diameter of the heaters fit the snow thrower, it wouldn't be a difficult modification at all providing the engine's electrical output voltage is 12 volts. Is that what these engines put out? I've never measured the output on one.
This message was modified Dec 4, 2008 by borat
|
friiy
Location: Las Vegas, The Desert
Joined: Apr 11, 2008
Points: 600
![]()
|
|
|
Re: Home made impeller kit
Reply #9 Dec 4, 2008 3:36 pm |
|
Most of the old engines that had a charging circut also had a lead of un-rectified voltage to use for a headlight assy. The voltage was about 15 max if i remember right.. I guess so you could run it through a bridge rectifier and still have charging power for a 12 volt battery.. Hey Borat, I never worked on a thrower in the desert, I noticed the impeller has a curve to it (like a boat prop). wouldn't it be better extend the wiper/ rubber the full length of the impeller? Or does that area extend intothe first stage and grab snow? (meaning it is not in contact with the housing of the second stage) Friiy |
borat
Joined: Nov 9, 2007
Points: 2692
![]()
|
|
|
Re: Home made impeller kit
Reply #10 Dec 4, 2008 4:19 pm |
|
Most of the old engines that had a charging circut also had a lead of un-rectified voltage to use for a headlight assy. The voltage was about 15 max if i remember right.. I guess so you could run it through a bridge rectifier and still have charging power for a 12 volt battery.. Hey Borat, I never worked on a thrower in the desert, I noticed the impeller has a curve to it (like a boat prop). wouldn't it be better extend the wiper/ rubber the full length of the impeller? Or does that area extend intothe first stage and grab snow? (meaning it is not in contact with the housing of the second stage) Friiy
I don't think that 15 volts would be too much for heaters. They're not that sophisticated. The rheostat that controls the heat might have problems with it. One would have to check the voltage tolerances to be sure.
Not sure what you mean about extending the wiper the full length of the impeller. Don't think that would be possible to extend into the auger side. The curved ends of the impeller that face the auger appear to be designed to cut off/gather and pull in snow fed by the auger. The critical swept area would be the span inside the impeller housing where snow is ejected through the hole to the chute. The closer the tolerance on either end of the impeller vane inside the impeller housing as well as a close fit to the circumference of the impeller housing will create the best seal. From reading previous posts, about this modification, the results are quite impressive if done correctly. From the pictures here, looks like he's done his home work.
|
|
|